Introducing Retrospect
- 13 Nov 2023
- 21 Minutes to read
- Print
- DarkLight
- PDF
Introducing Retrospect
- Updated on 13 Nov 2023
- 21 Minutes to read
- Print
- DarkLight
- PDF
Article Summary
Share feedback
Thanks for sharing your feedback!
This chapter first describes the different editions of Retrospect, then defines the program’s hardware and system requirements. Next, you’ll see how to install Retrospect’s components, and how to upgrade from previous versions of Retrospect. Finally, there’s a basic overview of Retrospect’s console, which is the user interface you’ll be working with the most.
Overview of Retrospect
To backup and restore data, Retrospect uses three software programs:
The Retrospect engine is the backup and restore software running on the Retrospect server, which is the computer that has the storage devices attached to it. The Retrospect engine runs in the background on the Retrospect server. If you have more than one Retrospect license, you can control multiple Retrospect servers from a single user interface.
The Retrospect console, also called the Retrospect application, provides the user interface with which you control the functions of the program. You’ll use this to create immediate or scripted backups; restore backed up files and folders; monitor running backup and restore activities; get reports of recent and scheduled activities; and much more. The Retrospect console doesn’t have to be installed on the same computer as the Retrospect engine. If you have a larger installation with more than one Retrospect server on your network, you can administer all activities on each server from a single Retrospect console.
The Retrospect Client software must be installed on every computer on your network (Mac, Windows, or Linux) that you wish to back up to the Retrospect server. The Client software allows Retrospect to copy and restore data across the network, as though the client computers’ drives were connected directly to the Retrospect server.
Which Edition Is Right for You?
Retrospect is licensed in four main ways:
- Multi Server – Protects any number of networked Windows, Mac, and Linux servers, desktops, and notebooks from a single host computer running Retrospect. Supports disk, cloud, and tape storage devices.
- Single Server Unlimited – Protects one server and any number of networked Windows, Mac, and Linux desktops and notebooks from a single host computer running Retrospect. Additional server client licenses can be purchased to protect more networked Windows, Mac, or Linux servers. Supports disk, cloud, and tape storage devices.
- Single Server 20 – Protects one server and up to 20 networked Windows, Mac, and Linux desktops and notebooks from a single host computer running Retrospect. Additional Retrospect Client and server client licenses can be purchased to protect more systems. Supports disk, cloud, and tape storage devices.
- Single Server 5 – Protects a single Mac Server and five workstations using local, network, and cloud disk- based storage. Tape devices are not supported.
- Desktop – Protects a single non-server Mac and up to five additional Windows, Mac, and Linux desktops and notebooks.
Retrospect Add-On Products
A number of advanced Retrospect features are only available if you have the appropriate license code. To view your current licenses, or to purchase additional licenses, choose Retrospect > Preferences, then click the Licenses tab.
- Open File Backup Unlimited – Protects open files on NTFS-formatted volumes on Windows servers, desktops, and laptops. This add-on makes it possible to protect line-of-business applications—such as accounting, CRM, and proprietary database systems—while they’re running, even those with data files spread across multiple volumes. Retrospect’s Open File Backup Unlimited add-on extends to all Windows systems protected by your Retrospect host server, including end-user desktops and laptops.
- Advanced Tape Support – Improves backup times by utilizing multiple tape drives in parallel, including multiple stand-alone drives, drives in libraries, or drives in autoloaders. The Advanced Tape Support add-on is licensed per Retrospect host server, not per tape drive. For example, only one Advanced Tape Support add-on license is required for a library with four tape drive mechanisms.
- Retrospect Client Packs – Extends the number of networked desktops and notebook computers that can be backed up using Retrospect Disk-to-Disk or Desktop editions. Available in 1, 5, and 10 client license packs.
- Retrospect Server Client – Extends the number of networked servers that can be backed up using Retrospect Single Server editions. Each Retrospect Server Client adds a license for protecting one additional server as a network client.
- Annual Support & Maintenance (ASM) – Provides technical support via email and phone (available in select regions) and all upgrades/updates of purchased product at no additional cost for 1 year from the date of ASM purchase.
System Requirements
Retrospect Backup 19 for Mac
Supported Operating Systems:
- Apple macOS Sonoma / Sonoma Server 14
- Apple macOS Ventura / Ventura Server 13
- Apple macOS Monterey / Monterey Server 12
- Apple macOS Big Sur / Big Sur Server 11
- Apple macOS Catalina / Catalina Server 10.15
- Apple macOS Mojave / Mojave Server 10.14
- Apple macOS High Sierra / High Sierra Server 10.13
- Apple macOS Sierra / Sierra Server 10.12
- Apple OS X El Capitan / El Capitan Server 10.11.6
- Apple OS X Yosemite / Yosemite Server 10.10.5
- Apple OS X Mavericks / Mavericks Server 10.9.5
- Apple OS X Mountain Lion / Mountain Lion Server 10.8.5
* Retrospect Desktop doesn’t run on Mac OS X Server.
Supported Hardware:
- Apple Silicon processor with one or more multicore processors
- Intel processor with one or more multicore processors
Recommended Configuration:
- Latest Software Update for OS X
- 1 GB for each concurrent activity; 4 GB minimum
- 10-15 GB of temp hard disk space for each concurrent activity (backup, restore, etc.)
- Adequate storage for backups
- RAM that meets Apple's guidelines for each OS
Retrospect Backup 19 Client for Mac
- Apple macOS Sonoma / Sonoma Server 14
- Apple macOS Ventura / Ventura Server 13
- Apple macOS Monterey / Monterey Server 12
- Apple macOS Big Sur / Big Sur Server 11
- Apple macOS Catalina / Catalina Server 10.15
- Apple macOS Mojave / Mojave Server 10.14
- Apple macOS High Sierra / High Sierra Server 10.13
- Apple macOS Sierra / Sierra Server 10.12
- Apple OS X El Capitan / El Capitan Server 10.11.6
- Apple OS X Yosemite / Yosemite Server 10.10.5
- Apple OS X Mavericks / Mavericks Server 10.9.5
- Apple OS X Mountain Lion / Mountain Lion Server 10.8.5
* Backing up server OS clients requires Retrospect Multi Server or other Server edition with available Server Client Licenses.
Supported Hardware:
- Apple Silicon processor with one or more multicore processors
- Intel processor with one or more multicore processors
Recommended Configuration:
- Latest Software Update for OS X
- RAM that meets Apple's guidelines for each OS
Retrospect Backup 19 Client for Windows
- Microsoft Windows 10 and 11
- Microsoft Windows XP, Vista, 7, 8
- Microsoft Windows Server 2003, 2008, 2012, 2012 R2, 2016, 2019, 2022
- Microsoft Windows Server Core 2008 R2, 2012, 2016, 2019
- Microsoft Windows Server Essentials 2012, 2016
- Microsoft Windows SBS 2003, 2008, 2011
- Microsoft Windows Storage Server 2003, 2008
*Backing up server OS clients requires Retrospect Multi Server or other Server edition with available Server Client Licenses.
Retrospect Backup 19 Client for Linux
- x86- or x64-based system running Red Hat Linux, Red Hat Enterprise Linux, CentOS, Debian, Ubuntu Server and SUSE Linux (Details)
- glibc version 2 or later
Storage Devices
Retrospect supports a wide variety of storage devices as the destination for backups, including hard drives (both direct- and network-attached), tape drives and libraries, flash storage, and removable disk drives (RDX, REV, etc.). See the Retrospect Device Support Database for a complete list of supported tape drives and libraries.
Installing Retrospect Backup
To install Retrospect, you need to install three separate software programs:
- On the Retrospect server (i.e., the machine that will be performing the backups on your network, and that has backup storage devices attached), you must install the Retrospect engine.
- On one or more machines that will be administering Retrospect, you must install the Retrospect console. A single console can control one or more Retrospect servers.
- On each machine on the network you want to back up with Retrospect, you must install the Retrospect Client software. There are Retrospect Client installers for Mac OS X, Windows, Linux.
Installing the Retrospect Backup Console and Retrospect Backup Engine
To install the Retrospect console:
- Download Retrospect Backup for Mac from the website.
- Unzip the file.
- Double-click on "Install Retrospect".
- Click "Install Retrospect" from the dialog.
- Retrospect Backup Console will be installed in "Applications" and auto-launched, and Retrospect Backup Engine will be automatically installed and launched in the background as a service.
- For macOS Mojave and macOS Catalina, please follow our step-by-step guide for enabling "Full Disk Access" below. See the step-by-step guide.
If you need Retrospect Backup Console without an engine installed, please visit our Downloads page.
Installing Retrospect Client software on a machine running Mac OS X
Note: To install the Retrospect Client software using the public/private key authentication method, which provides additional security and allows the Retrospect server to automatically connect to clients with the matching public encryption key, refer to Chapter 4: Working with Clients, Servers, and Network Shares.
- On each machine you want to backup over the network to a Retrospect server, insert the Retrospect CD or double-click the downloaded disk image to mount it on your desktop.
- Double-click the Client Installers folder to open it, then double-click to open the Mac Client Installer folder. Finally, double-click Install OS X Client.
- When prompted by the Installer, enter an administrator’s username and password, then click OK.
- Follow the installer program’s instructions.
- For macOS Mojave and macOS Catalina, please follow our step-by-step guide for enabling "Full Disk Access" below. See the step-by-step guide.
Installing Retrospect Client software on a machine running Microsoft Windows
Note: To install the Retrospect Client software using the public/private key authentication method, which provides additional security and allows the Retrospect server to automatically connect to clients with the matching public encryption key, refer to Chapter 4: Working with Clients, Servers, and Network Shares.
1. On each machine you want to backup with Retrospect, copy the Windows Client Installer folder found inside the Client Installers folder on the Retrospect CD or downloaded disk image to the Windows desktop.
2. Open the Windows Client Installer folder.
3. Double-click Retrospect Client for Windows [version number].exe, then follow the program’s instructions.
4. If requested, restart the Windows client machine.
Installing Retrospect Client software on a machine running Linux
- Copy the appropriate file to a location on the network, then copy the file to the Linux computer on which you want to install the client software.
- Enter the following commands.
- $ tar -xf Linux_Client.tar
$ ./Install.sh
- Create and enter a password to prevent unauthorized access to the client; do not forget this password.
Note: Use only basic alphanumeric characters (low-bit ASCII) in passwords for clients. Macintosh high-bit characters do not correspond to Windows high-bit characters. For example, Luf$Luf00 is okay but Lüf•Lüføø will cause problems.
The client software runs automatically upon completion of installation.
Upgrading from Previous Versions of Retrospect
Because Retrospect for Mac has a different underlying architecture and uses different configuration files than previous versions of Retrospect for Mac, version does not import settings from version 6.x or earlier installations. When upgrading, it is therefore necessary to rebuild the backup environment in Retrospect. The general steps to take are as follows, along with the chapters in which these steps are covered in this Users Guide.
1. Install Retrospect server and console (Chapter 1); configure
preferences (Chapter 7).
2. Create new Media Sets and assign media to contain the backup data (Chapter 5).
3. Create new Rules (which replace Selectors from previous versions) (Chapter 7).
4. Log in Retrospect client computers and network shares (Chapter 4).
5. Define Favorite Folders, which replace subvolumes from previous versions (Chapter 3).
6. Assign tags, which replace Source Groups from previous versions (Chapter 3).
7. Create scripts for backup, copy, grooming, etc. operations (Chapters 5 and 7).
Upgrading from Retrospect 6.1
The Retrospect for Mac installation process does not overwrite or remove existing Retrospect 6.1 (or earlier) installations. It is recommended that you continue to maintain your existing Retrospect installation until you are comfortable with Retrospect for Mac.
To keep your existing Retrospect 6.1 (or earlier) installation and prevent that version’s scripts from automatically running, take the following steps:
- For each backup, duplicate, and restore script with a schedule, edit the script’s schedule and check the box to “Skip scheduled executions.” Enter a date that is several years in the future.
- For each Backup Server script, edit its schedule and set the schedule to never active.
Should you instead wish to remove your previous installation of Retrospect, locate the disk image containing the installer for your current Retrospect installation (or download it from the Archives section of the Retrospect website) and follow these steps:
- Double-click the Install Retrospect icon and provide your password and agreement to the license.
- Choose Uninstall from the Easy Install pop-up menu.
- Click the Uninstall button and follow the on-screen instructions.
Stopping and Starting the Retrospect Engine
After you install the Retrospect engine on the Retrospect server machine, it automatically starts, and you should not normally need to interact with it other than by using the Retrospect console. However, if you want to manually shut down the engine, you may do so.
1. On the Retrospect server machine, open System Preferences.
2. In System Preferences, click the Retrospect icon.
3. Click the padlock icon in the lower left corner of the window. Enter an administrator’s name and password and click OK.
4. To shut down the engine, click Stop Retrospect Engine. After a moment, the engine stops, and the button changes to Start Retrospect Engine. Click the button again to restart the engine.
5. Normally, the Retrospect engine automatically starts upon system startup. If you do not want this to occur, uncheck “Launch Retrospect Engine on System Startup.”
Starting and Stopping the Retrospect Console
To start the Retrospect console, double-click the Retrospect application icon inside the Applications folder on your machine. The Retrospect console will open and automatically look for a Retrospect engine running on the same computer. If one is present and running, the Retrospect console will connect automatically. If a local Retrospect engine is not present, you may add one or more remote Retrospect engines by clicking the plus (+) button in the bottom bar of the console.
Tip: In the Server Address of the resulting dialog, you may enter the IP address of the machine with the running Retrospect engine, or, if the machine is on your local subnet, you may enter its Computer Name, for example, Server.local. You can find a machine’s Computer Name in the Sharing category of its System Preferences.
The first time you connect to a local or remote Retrospect engine, Retrospect opens its Preferences window and asks you to enter your license code for that engine. Enter this information, then click Add.
At the registration screen prompt, click one of the following buttons:
- Register, if you have not registered your copy of Retrospect and would like to do so. Clicking this button will launch your default Web browser and take you to the registration website, where you can fill out a registration form.
- Already Registered, if you have already registered your copy of Retrospect.
Depending on the license code you entered, the Licenses pane of Retrospect Preferences will show the codes for the Application, Backup Clients, or Storage Devices.
Tip: While the Preferences window is still open, we suggest that you take a moment to click on the General pane, and enter a name for the Retrospect server in the Server name field. By default, Retrospect uses the server machine’s Computer Name as shown in System Preferences’ Sharing panel as the server name, which may not be as descriptive to you and your users as you would prefer.
You should also assign a password for each Retrospect engine you logged in by clicking the “Change server password” button and entering a password of your choice. This step prevents unauthorized access of the Retrospect engine from other Retrospect console applications running on your network.
When you’re done with the Preferences window, click its close box to dismiss it.
To exit Retrospect, choose Quit Retrospect from the Retrospect menu, or press Cmd-Q.
Overview of the Retrospect Console
The Retrospect console is the user interface that controls actions that occur on the Retrospect server. The Retrospect console can be running on the Retrospect server machine, or it can operate the server from elsewhere on the network. Let’s take a detailed look at the console window.
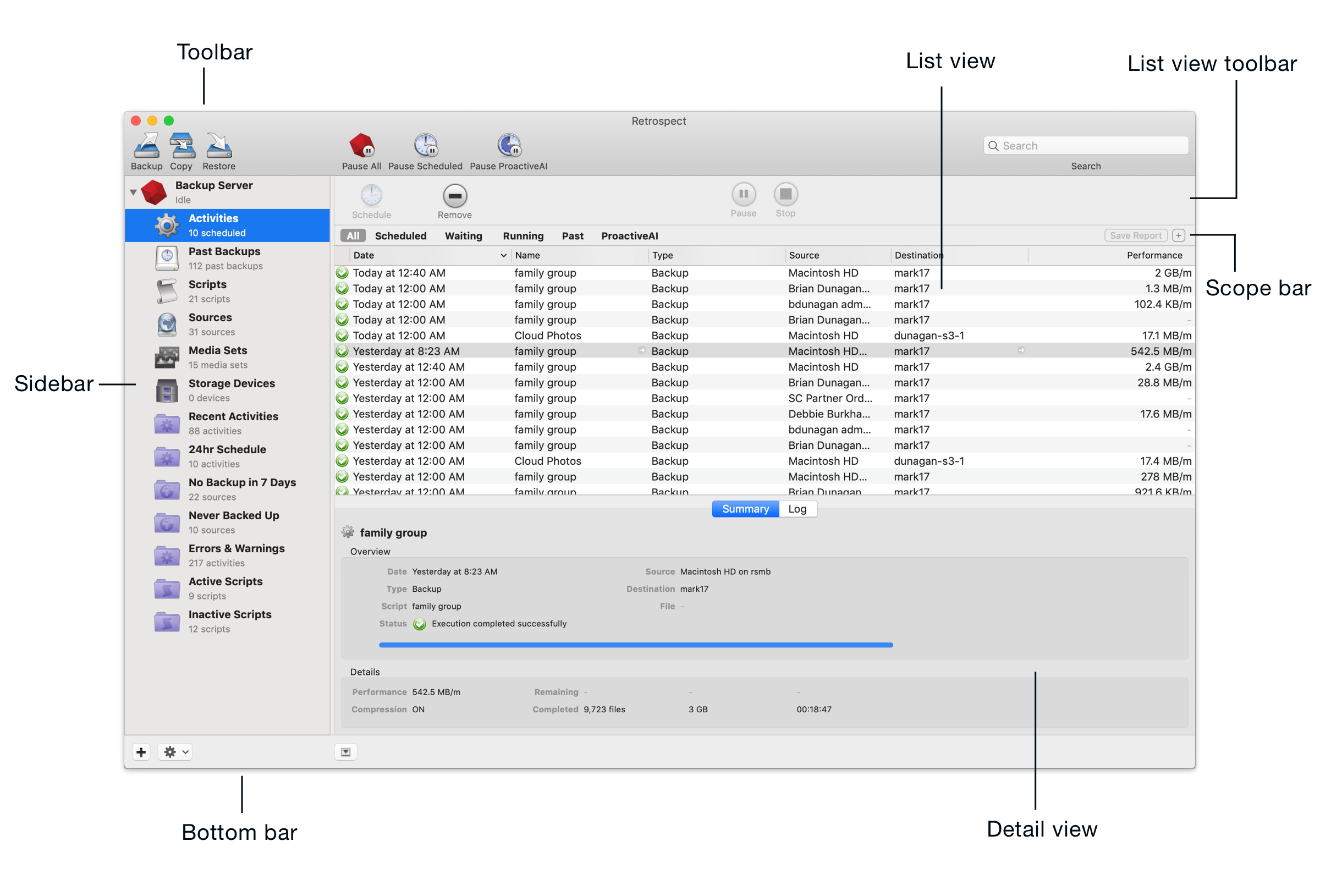
The Retrospect console window is made up of several sections:
Toolbar
The toolbar across the top of the window contains buttons to launch the Backup, Copy, and Restore Assistants (these are the easiest way to create scripts and perform activities in Retrospect), the pause activity buttons, and the Search Field.
Sidebar
The sidebar on the left is where you choose which Retrospect server to control. If you have multiple Retrospect servers on your network, all of them will appear in the sidebar. Click on the disclosure triangle next to a server to show or hide its items, which allow you to control the functions of that server. Each server has the following items:
• Activities shows a list of the backup, copy, and restore events that Retrospect has performed, is performing, or is scheduled to perform (depending on your choice from the scope bar). Status icons in the left-most column show if the activity was successful or had problems. You can also tell the date and time of the activity; the name of the script associated with the activity; the type of operation; the activity’s sources and destinations; and (for current and past operations) the speed of the activity.
• Past Backups combine previous versions of Retrospect’s concepts of Snapshots (the listing of all files present on a source volume during a backup) and sessions (the actual files copied during a backup
operation). You can filter the list of past backups by Mac or Windows clients.
• Scripts control all actions in Retrospect, either with or without a schedule. The concept of immediate actions without creating a script (like an immediate backup) no longer exists. Any script can be run immediately by highlighting a script in the Scripts list and clicking the Run button in the list view toolbar.
You can explore and modify a selected script using the detail view below the Scripts list. By clicking on the tabs in the detail view, you can view a summary of the script; set the script’s source, destination, and rules; create or modify a schedule for the script to run; and set various script options.
• Sources displays a list of all local volumes and logged-in network shares for the Retrospect server, and added Retrospect client computers. You may add any client computers running the 6.1 (or later) Retrospect Client for Mac or the 7.6 (or later) Retrospect Client for Windows by clicking the Add button in the list view toolbar of the Sources list view. NAS devices and shares can be added similarly. The Sources list gives you information about each Source, including its name, the machine it resides on, the OS that machine is running, its capacity and how much of that capacity is used.
• Media Sets shows you a list of the Media Sets used for backups. Using the scope bar, you can filter the results of the list by the different Media Set types: All, Tape, Disk, and File.
• Storage Devices shows a list of the storage devices attached to the Retrospect server. This list does not display hard disks, removable disks, or NAS volumes (those are shown under Sources); rather, it includes hardware devices such as optical and tape drives and libraries.
- Reports are the last item in the sidebar. Click the disclosure triangle to view the list of included reports. Custom reports can be saved from nearly any list view. Right-click any of the column headings in a list view to show or hide specific columns you want to appear in the report, click the column heading to set the sort order, click scope buttons to filter the results shown in the list, click the plus (+) button at the right of the scope bar to add further filter conditions, drag conditions if needed to change their order, then click Save Report in the scope bar. You’ll be asked to name the report. Any reports that you create will appear at the bottom of the Reports list.
List and Detail Views
The list view and an optional details view are in the main section of the window. The list and detail contents change depending on the item selected in the sidebar, and on choices made in the scope bar.
List View Toolbar
The list view toolbar beneath the main toolbar displays a variety of
context-sensitive buttons based on the selected item in the sidebar.
Scope Bar
The scope bar has context-sensitive scope buttons, the Save Report button, and the (+) add condition button which appears above the list view when appropriate and allows you to filter the list view based on pre- and
user-defined conditions.
Bottom Bar
The bottom bar contains the (+) add button to add a Retrospect server to the sidebar, the gear icon Action menu button (which allows you to edit reports and pause operations) and the show/hide button for the details pane.
Other Views
First Launch — When the Retrospect console first launches it displays the startup view. From here you can install a local server, add a remote server, view this User's Guide, contact Support, and visit the Retrospect website.
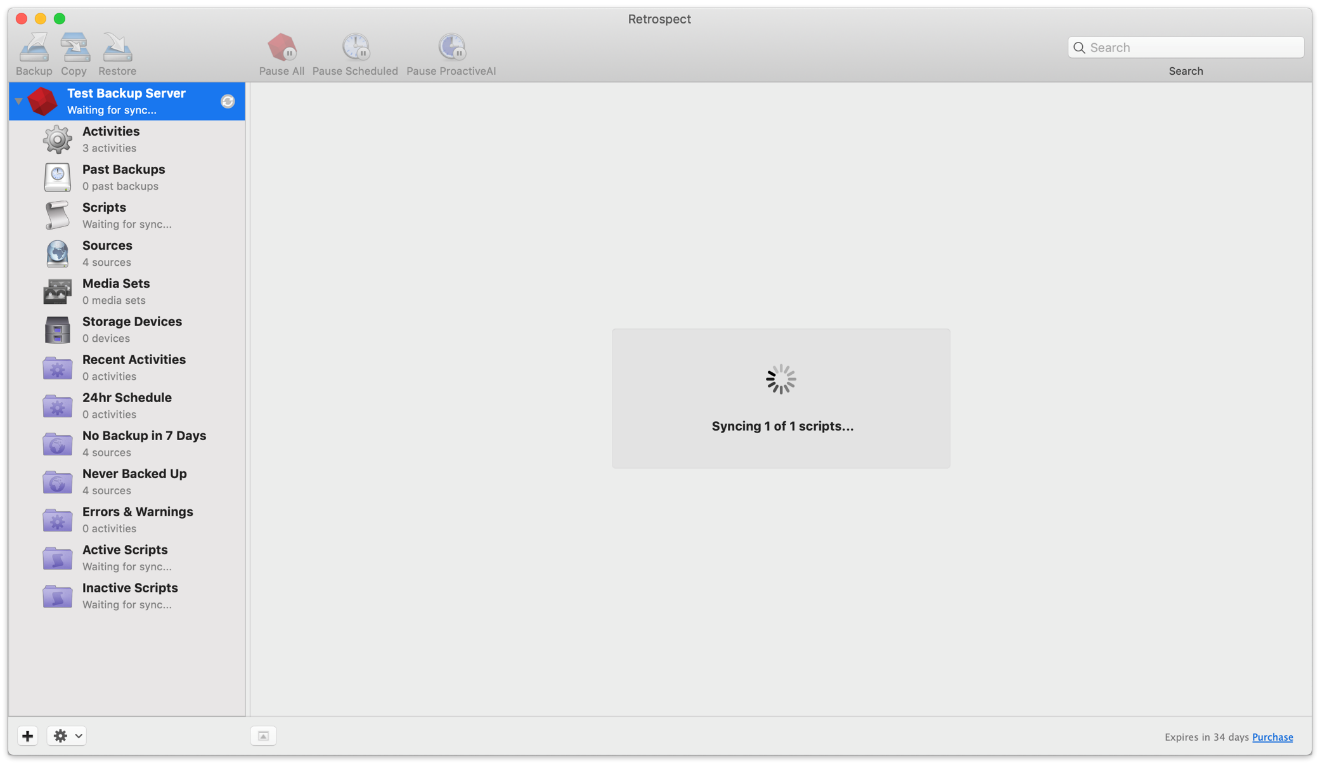
Syncing Server — When the Retrospect console connects to a server, it will sync that server's information. For small installations, this process is quick, but for larger ones, this may take a while. The console is optimized to let you get started while the syncing process is running in the background.
Multiple Servers — Retrospect can control multiple servers from the console window. A separate Retrospect license is required for each server. There is full support for Mac version 9.0 and above and limited support for Mac version 8.2.
Licensing Server — When adding a server, Retrospect will prompt you to enter your license code. Enter the license code then click Add.
Unlocking Server — When adding a server that has a password Retrospect will display a password error and let you update the password.
Updating Server — Each new version of the Retrospect console includes an updated server installer. When the console is launched it will notify you if your servers can be updated. If you choose not to install the updated server, you can do so at any time.
Updating Server — To install the updated server at a later time, click the update icon. Retrospect will automatically install the new server software.
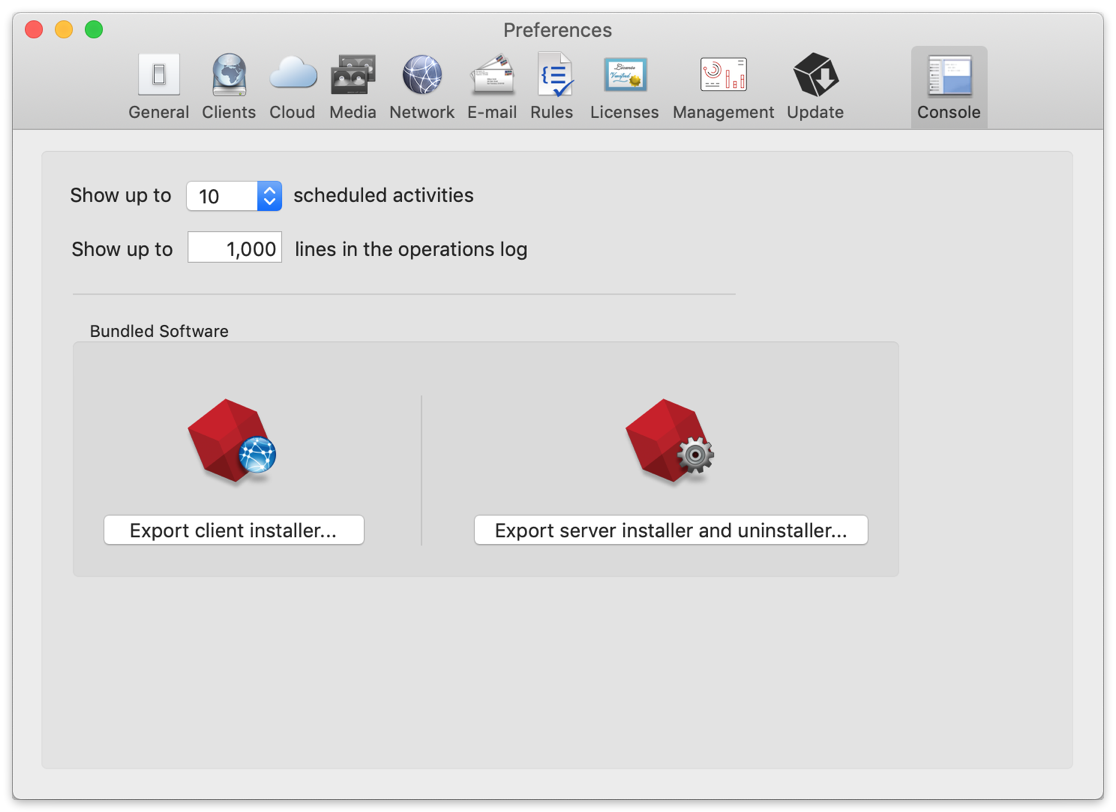
Exporting Installers — Retrospect includes a server installer, client installers for Mac, Windows, and Linux, and client updaters (RCUs) for Mac, Windows, and Linux. To export these to a local folder, open Preferences from the menu bar under Retrospect > Preferences... and click on Console.
Retrospect Dashboard
Retrospect Dashboard gives you a detailed monitoring view for your entire Retrospect Backup engine. Let’s walk through each section of the dashboard to discuss how you can use it to understand the current status of your business’s data protection strategy.
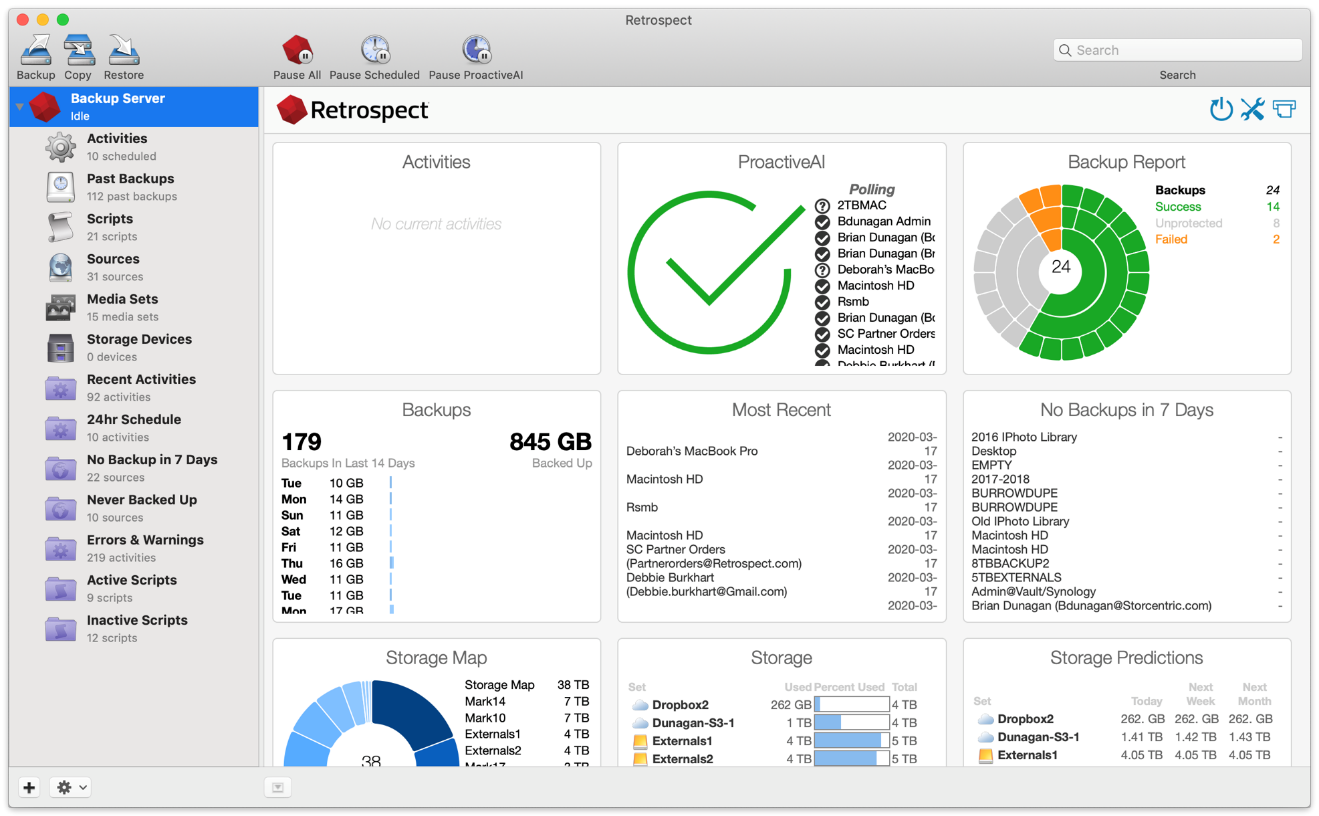
Activities
Running activities are displayed here.
ProactiveAI
You can see which sources are protected or not protected with ProactiveAI and their respective statuses. It should be all green, unless you have a subset of sources protected by scheduled scripts.
Backup Report
You can see all of the sources within the scope of your search and their statuses:
- Green: This is a source with a successful backup.
- Orange: This is a source with a failed backup.
- Black: This is a source with a stopped backup.
- Gray: This is an unprotected source.
This coloring gives you an at-a-glance check for how your backups are doing. If they are not all green, you should drill into which ones are not fully protected.
Backups
This is a list of the backups within the last 14 days and how much data they backed up.
Most Recent
This is a list of the most recently protected sources and the date they were last protected.
No Backups in 7 Days
This is a list of sources that have had no backup in 7 days.
Storage Map
You can see how much data each backup set takes up and the total amount used.
Storage
This is a list of the backup sets and their usage.
Storage Predictions
Storage Predictions takes the current analytics for each set and predicts how much data will likely be used in the next week and the next month. You can use this to estimate when to add more storage or when Retrospect grooming will occur to free up space.
Enabling "Full Disk Access"
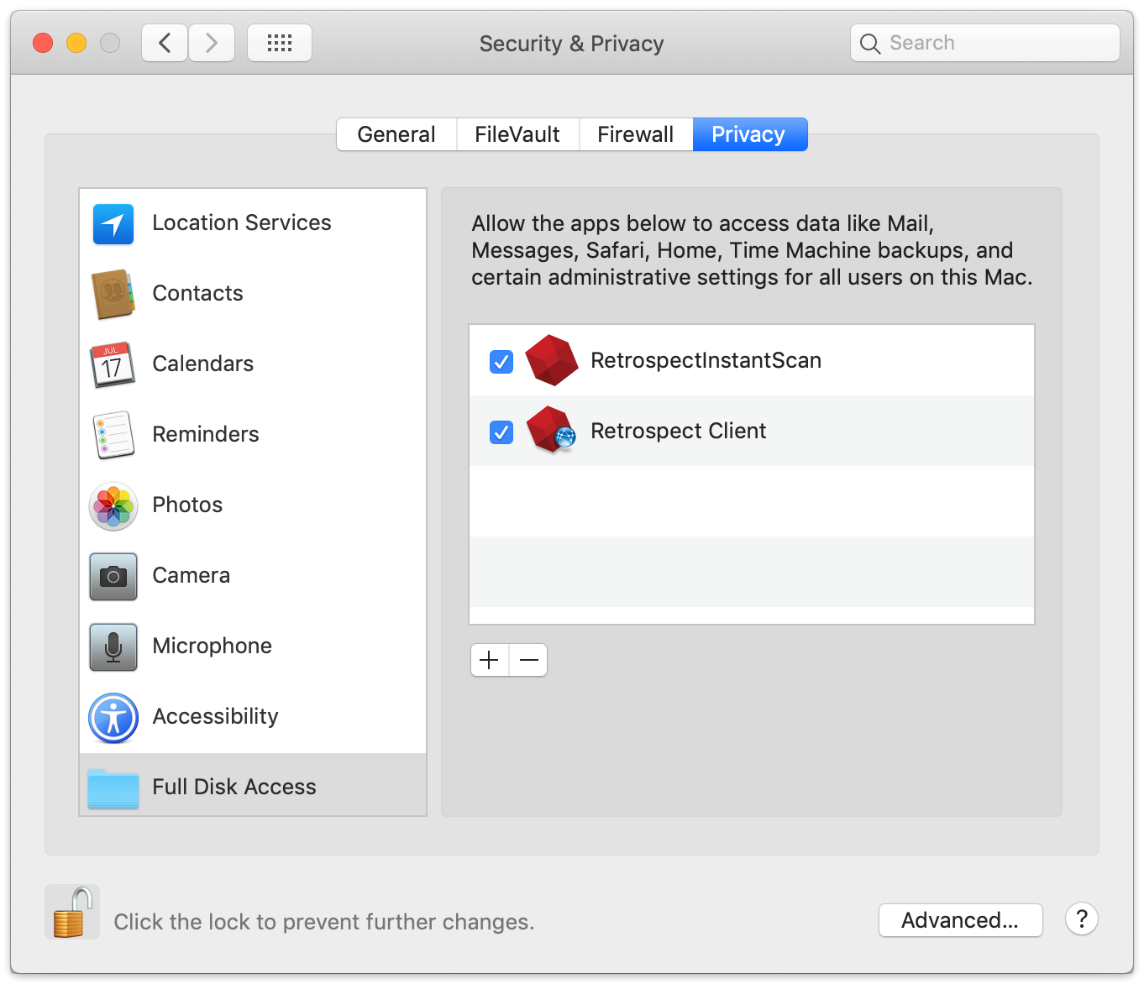
macOS Catalina (10.15) extends the Full Disk Access security feature from macOS Mojave (10.14) to help users manage their data privacy. This additional protection ensures you know exactly which applications have access to your data by requiring explicit consent for file-level access to certain application data folders, like Mail, Messages, and Safari, so Retrospect Backup engine and client will not be able to access the entire system without explicit user action. Follow our step-by-step guide to allow Retrospect Backup to continue protecting your Mac environment, under System Preferences > Security & Privacy > Privacy > Full Disk Access.
Engine Setup
- Open "System Preferences" under the Apple at the top left of your screen.
- Click on "Security & Privacy" then "Privacy". You should see "Full Disk Access".
- Click on the lock to authenticate and allow changes.
- Now you need to find the Retrospect applications to drag into this list. Go to "Finder". Select "Go" from the menu bar and then "Go to Folder…". Enter:
/Library/Application Support/Retrospect
- Scroll down "RetrospectEngine" and "RetrospectInstantScan" and drag them into the "Full Disk Access" list. Close "System Preferences".

Client Setup
- Open "System Preferences" under the Apple at the top left of your screen.
- Click on "Security & Privacy" then "Privacy". You should see "Full Disk Access".
- Click on the lock to authenticate and allow changes.
- Now you need to find the Retrospect applications to drag into this list. Go to "Finder". Select "Go" from the menu bar and then "Go to Folder…". Enter:
- /Library/PreferencePanes (Retrospect Client)
/Library/Application Support/Retrospect (RetrospectInstantScan)
- Scroll down "Retrospect Client" (from the first folder) and "RetrospectInstantScan" (from the second folder) and drag them into the "Full Disk Access" list. Close "System Preferences".
Security and Encryption
Retrospect Backup protects your data in-transit and at-rest with industry-standard encryption algorithms. Let’s walk through the different ways that your data is encrypted:
At-Rest Encryption
Retrospect Backup supports AES-256 encryption for all backup sets stored on any media, encoded on host, so your backups are encrypted before they touch the destination. That means cloud storage providers will never be able to access your data, but it also means no one can recover your data if you lose the encryption key.
In-Transit Encryption
Retrospect Backup supports a number of different network connections:
- Clients: The agent-based connection is encrypted with AES-256 between the Retrospect Backup instance and the Retrospect Client agent for Windows, Mac, and Linux. For client-based history, on-demand backup, and on-demand and restore, the network connection is encrypted with AES-128.
- Console: If you use the Retrospect Console for Mac on a different computer than the Retrospect Backup instance, the network connection is encrypted with AES-128.
- Cloud Storage: The network connection is encrypted with HTTPS using TLS between the Retrospect Backup instance and the cloud storage provider. It supports up to TLS 1.2.
- Retrospect Management Console: The network connection is encrypted with HTTPS using TLS between the Retrospect Backup instance and console.retrospect.com. It supports up to TLS 1.2.
Was this article helpful?