Teams
-
Backup of external chat/message, attachment to system message backup (e.g. meeting recording) and backup tabs, pins for chat/channel are not supported.
-
Restore of chat/channel to original thread is not supported. Restore only as data export in HTML format, stored to local or OneDrive.
-
Refer to the table below for the limitations regarding Teams Chat backup.
|
Teams Chat only without OneDrive |
Teams Chat with OneDrive |
Entire Organization |
Only the chat room that include the selected users and messages sent by the selected users will be backed up. If the messages contain attachments (Files), the Files will not be backed up since OneDrive was not selected. |
Only the chat room that include the selected users and messages sent by the selected users will be backed up. If the messages contain attachments (Files), only the Files of the selected users will be backed up. It will not include the Files shared by other users that were not selected for backup.
This is a limitation with the Microsoft API, as the shared file is located in the other users’ OneDrive, which was not selected for backup.
To backup Teams Chat to include Files from all users in the chat, then all users who participated in the chat will also need to be selected for backup.
|
This Microsoft 365 user only |
Chat rooms of the login user will be backed up, including messages from other users and from the login user. If the messages contain attachments (Files), the Files will not be backed up since they are located in OneDrive which was not selected. |
Chat rooms of the login user will be backed up, including messages from other users and from the login user. If the messages contain attachments (Files), only the Files of the login user will be backed up, it will not include the files shared by other users since the other users were not selected for backup. |
Here are some sample scenarios:
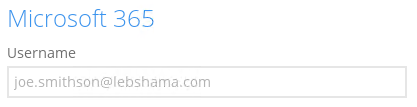
You are required to backup Microsoft 365 user: Tom
Tom is in a group Teams Chat which includes Amy, Joe and Teresa.
They chat about their project within the group, share files, etc.
If you create a Backup Set and select only Tom; it will include only messages sent by Tom for the 1:1 group chat where Tom is included.
It will only include files that Tom had attached. It will not backup file attachments from the other three participants.
There will be Warnings after backup that items were not backed up when not all the users involved in the conversation are selected for backup. This is a sample of the warning that can be viewed from the backup report “Messages from users joe.smithson@lebshama.com in Chat “Joe SmithsonTom Smith,” will skip to backup cause users are not selected”.
When you Restore from this Backup Set to choose this group Teams Chat you will only see messages from Tom. Check the screenshot of the actual conversation, as you can see the messages from the other users were not backed up.
You will only be able to download and/or restore files shared by Tom. This means you will need to include the other users in your Backup Set Source selection if you want to be able to download and/or restore the files they shared. In the screenshot below, only files shared by Tom will be listed.
You are required to backup Microsoft 365 user: Joe.
-
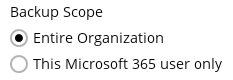
Backup Scope: Entire Organization
-
Microsoft 365 user: Joe and Tom
-
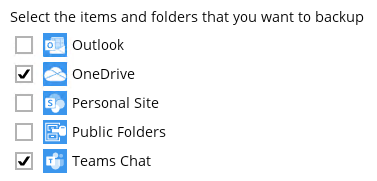
Data type: Teams Chat (assuming no Outlook or Personal Site data) and OneDrive
Joe has 1:1 chat with Teresa, and they shared files with each other.
Joe has 1:1 chat with Tom, and they shared files with each other.
If you create a Backup Set and select only Joe and Tom, it will include Joe’s chat message with Tom, and files shared by Joe and Tom. It will not include Teresa’s chat message and file attachments.
There will be Warnings after backup that items were not backed up when not all the users involved in the conversation are selected for backup. This is a sample of the warning that can be viewed from the backup report “Messages from users teresa.smits@lebshama.com in Chat “Joe SmithsonTeresa Smits,” will skip to backup cause users are not selected”.
When you Restore from this Backup Set to choose from Joe’s list of chats, you can open the conversation between Joe and Tom, you can also restore any files they shared with each other.
The chat displays messages from Joe and Tom.
Files shared between them can also be downloaded and/or restored.
But when you click on the conversation with Teresa, you will see the chat messages from Joe only. Please refer to the screenshot of the actual chat.
Only the file that Joe shared with Teresa will be available for download and/or restore. Files that were shared by Teresa will not be available since she was not selected in the Backup Source Selection.
You are required to backup Microsoft 365 user: Joe.
Selection:
* Backup Scope: Entire Organization
+
+
* Microsoft 365 user: Joe and Tom
+

+
* Data type: Teams Chat
+

Joe has 1:1 chat with Teresa, and they shared files with each other.
Joe has 1:1 chat with Tom, and they shared files with each other.
If you create a Backup Set, and select only Joe and Tom, it will include Joe’s chat message with Tom. It will not include Teresa’s messages as Teresa is not selected. It will also not include any files attached as OneDrive is not selected.
There will be Warnings after backup that items were not backed up when not all the users involved in the conversation are selected for backup. This is a sample of the warning that can be viewed from the backup report “Messages from users teresa.smits@lebshama.com in Chat “Joe SmithsonTeresa Smits,” will skip to backup cause users are not selected”.
When you Restore from this Backup Set to choose from Joe’s list of chats, and open the conversation between Joe and Tom, you can only restore messages.
Files that they shared with each other will be listed under the Files tab, but you cannot download and/or restore them.
And when you click on the download button, this error message will appear because OneDrive is not a selected Data Type, which means the shared file was not backed up since file attachments are saved in OneDrive.
But when you click on the conversation with Teresa, you will see the chat messages from Joe only since Teresa is not selected as a backup source.
Only files shared by Joe will be listed under the Files tab, but it will not be available for download and/or restore.
This error message will be displayed when you click on the download button since OneDrive is not a selected Data Type.
You are required to backup Microsoft 365 user: Teresa.
Selection:
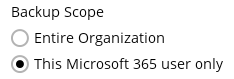
* Backup Scope: This Microsoft 365 user only
+
+
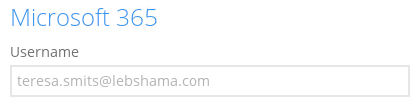
* Microsoft 365 user: Teresa
+
+
* Data type: Teams Chat (assuming no Outlook or Personal Site) and OneDrive
+
Teresa is in a group Teams Chat which includes Amy, Joe and Tom.
They chat about their project within the group, share files, etc.
If you create a Backup Set, it will include all messages sent by Teresa as well as messages from the other users for the 1:1 group chat where Teresa is included.
It will only include files that Teresa had attached. It will not backup file attachments from the other three participants.
When you Restore from this Backup Set to choose this group Teams Chat you will see all the messages in the chat. Please refer to the screenshot of the actual conversation above, as you can see all the messages from all the users were backed up.
You will only be able to download and/or restore files shared by Teresa. In the screenshot below, all the files shared in the chat will be listed.
But you will not be able to download and/or restore the files shared by the other users. When you click on the download button, the message below will be displayed.
You are required to backup Microsoft 365 user: Joe.
Selection:
* Backup Scope: This Microsoft 365 user only
+
+
* Microsoft 365 user: Joe
+
+
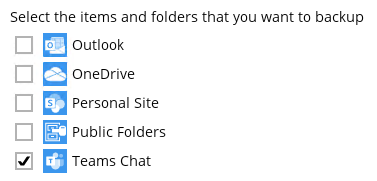
* Data type: Teams Chat
+
Joe has a 1:1 chat with Tom, and they shared files with each other.
If you create a Backup Set, it will include Joe’s chat message with Tom. But it will not include any files attached as OneDrive is not selected.
When you Restore from this Backup Set and open the conversation between Joe and Tom, you can only restore messages.
Files that they shared with each other will be listed under the Files tab, but you cannot download and/or restore them.
And when you click on the download button, this error message will appear because OneDrive is not a selected Data Type, which means the shared file was not backed up since file attachments are saved in OneDrive.


