By definition, a disaster is when something really bad happens. Part of your backup strategy needs to plan for disaster in order to accomplish the recovery of your data in its aftermath. That’s what this chapter is about. The disaster can be as simple as a hard drive failure or computer theft, or be the result of a physical disaster, such as a fire or a flood.
The key principle behind disaster recovery is simple, yet critical: if you don’t back up everything, you can’t restore everything. That’s why, as part of your overall backup plan, you must include complete backups of each computer you want to protect, not just the contents of a Favorite Folder. You’ll then use the contents of a complete backup to restore all of your data.
When you need to recover from a disaster, you often don’t have the ability to boot from the computer that will be the destination for the restore. For example, if the computer’s hard drive had failed, but the replacement typically gets installed with no operating system present.
Retrospect offers two different types of backup. The first is the traditional archival method, called a backup, where Retrospect adds new and changed files to one or more of its Media Sets, essentially building an archive of every file that Retrospect has seen. This method saves both deleted files and previous versions of files, and it allows recovery to any backed up point in time. The Retrospect application must be used to perform restores from a backup.
The second method of backup is a clone-like operation, called a copy, where Retrospect makes a target disk look like the source disk by copying files and folders—in their native format—over to the target. This method has the advantage of providing a bootable copy of the source disk (as long as the original contained a bootable operating system), and it also has an option to save files in the copy that were deleted from the source. However, this method has the drawback of not keeping older versions of files, and for the copy to be bootable, each disk so protected needs its own target disk.
Procedures for performing backup and copy operations are found in “Working with Retrospect.”
Whether you have protected your data with a backup or a copy, the basic procedure is similar: you will be starting up the computer to which you will be restoring data (we’ll call that the target) with another Mac or an external hard drive (we’ll call that the source).
Each Retrospect Media Set has a corresponding Catalog—a database, really—that tells Retrospect exactly which files are contained in the Media Set, where they are on the media, and other information. To be able to restore from a Media Set, Retrospect needs to be able to access the Catalog belonging to that Media Set. If you no longer have the Catalog file, then you will need to rebuild it first by clicking the Rebuild button in Retrospect’s Media Sets view. Rebuilding a Media Set’s Catalog can take a long time, because Retrospect has to scan the media and read every file.
By default, Retrospect stores Catalog files on the Retrospect server in
/Library/Application Support/Retrospect/Catalogs/. It’s a good idea to periodically copy your Catalogs to alternate storage media, such as separate hard disk, a writable DVD, a flash drive, or another computer on the network.
Detailed instructions for safeguarding your Catalog files can be found under “Catalog and Configuration Backups.” In the same chapter, you can find instructions for rebuilding Catalogs, under “Rebuilding a Media Set.”
For disaster recovery on El Capitan and higher, you will need to use Retrospect Backup v17.0.1 or higher. It works with macOS System Integrity Protection, which is on Catalina (10.15) back through El Capitan (10.11). The steps differ from past versions of macOS because of this. Before, Retrospect could perform a bare-metal disaster recovery which did not need an underlying OS already installed. However, with System Integrity Protection, the best workflow to restore is installing macOS first and then running a live restore on top of it. This process ensures that Retrospect correctly recovers a user’s state, even with newer system protection features like Full Disk Access on macOS Catalina.
The steps are as follows.
Follow Apple Support’s article to reinstall the macOS version that is in your backup.
When the newly installed macOS prompts to create a user account, pick an account name that isn’t your backup, such as temp_user.
Disable macOS Software Update.
For Mojave or later: System Preferences > Software Update > Advanced > clear the checkbox for "Check for updates".

For an earlier macOS: System Preferences > App Store > clear the checkbox for "Automatically check for updates".

Turn off Screen Lock: System Preferences > Security & Privacy > General > clear the checkbox for "Require password".

Quit all applications.
Install Retrospect or Retrospect Client.
Retrospect needs to be listed under System Preferences > Security & Privacy > Privacy > Full Disk Access. This applies to both a local Retrospect engine and a remote Retrospect Client application. See the step-by-step guide.
Restore the entire macOS volume. During the restore, ignore macOS and application prompts to minimize system changes.
When restore completes, Retrospect would report an expected warning to list folders that are preserved by macOS System Integrity Protection and therefore not restored.
Restart macOS.
User data is restored. On Catalina, recreate user accounts using the exact same names as in the backup and choose "Use existing folder".
Enable macOS Software Update.
Reinstall apps (e.g. Drobo Dashboard) that adds kernel extensions in the "/Library/Extensions" folder.
For macOS Mavericks and lower, there is a different workflow because macOS does not yet include System Integrity Protection.
It can be very helpful, and save you a lot of time, if you prepare for disaster recovery by creating an Emergency Tools external hard disk that you can use to boot machines that you want to restore. This disk should contain the following:
Mac OS X (so that it is bootable)
The Retrospect console application and engine if you will want to recover the Retrospect backup server
An installed copy of the Mac Retrospect Client, so that you can use the Emergency Tools disk to restore data from the Retrospect server over the network
The Retrospect Client installation folder, containing the Client software for Macs, Windows, and Linux machines, as well as copies of any public/private keys in use by your Retrospect installation
Other utility software that you find useful, such as Micromat’s TechTool Pro and Alsoft’s Disk Warrior
When you build your Emergency Tools disk, you need to decide whether you are going to use an external disk drive that is connected using USB or FireWire (though some drives have both). Either connection method can work. Remember that Apple has made some Intel-based machines that lack FireWire altogether, so a USB-connected drive may be a better choice. However, you’ll have to make the final determination based on the mix of Mac models in your organization.
It’s easy to start up a Mac from an external hard drive, but it’s important to remember a few key points. Intel Macs and PowerPC Macs require different disk partition schemes, so a disk made to start up an Intel Mac won’t start up a PowerPC Mac, and the opposite is also true. Intel-based Macs can only be booted with disks that use the GUID Partition Table scheme; PowerPC-based Macs can only be booted with disks that use the Apple Partition Map scheme.
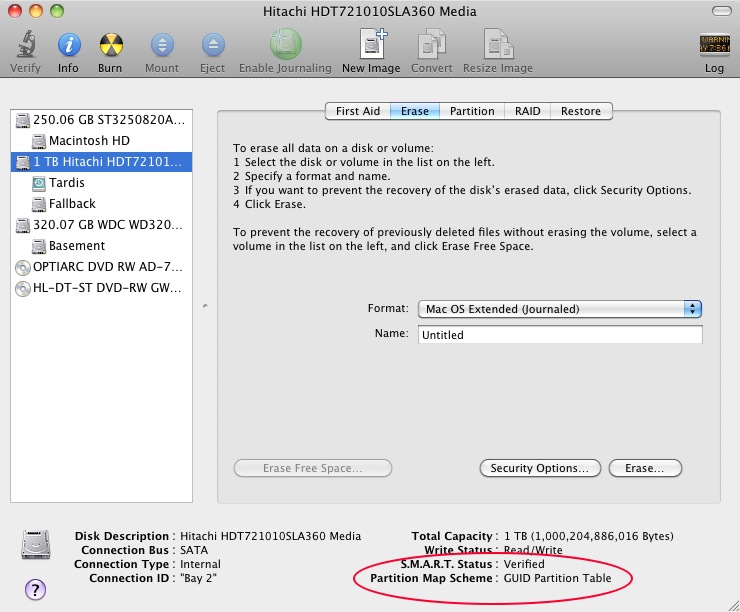
This means that you’ll need to be sure of the disk partitioning scheme used on any disk from which you hope to start up your Mac. You can check which partitioning format is used by running Apple’s Disk Utility application, selecting the hard disk you want to check, and noting the portioning scheme shown. Just be aware that repartitioning a disk to change its partition scheme will erase all the data already present on that disk.
If you prepare an Emergency Tools hard drive, and you have both Intel Macs and PowerPC Macs on your network, you’ll really need to create two Emergency Tools hard drives, one formatted for Intel Macs, the other for PowerPC Macs.
If you had previously backed up the target Mac using Retrospect’s backup method, the backed-up data will be contained within a Media Set, and you’ll need to use Retrospect to do the restore.
Macs with FireWire ports have a special hardware feature that can aid in disaster recovery, called Target Disk Mode. This feature allows you to turn a Mac (in this case, the Mac to which you wish to restore data) into an external hard disk drive that can be connected via FireWire to another Mac (ideally, the Retrospect server, because you will get the fastest restores over FireWire, rather than over the network). Target Disk Mode works with either FireWire 400 or FireWire 800 ports (naturally, data transfer will be faster over FireWire 800).
To perform a restore using FireWire Target Disk Mode, follow these steps:
To start the target Mac (the one to which you wish to restore data) in Target Disk Mode, turn it on and immediately hold down the T key on the keyboard. When the FireWire symbol appears and bounces around the screen, you can release the T key; the Mac is now in Target Disk Mode and can be connected to any other Mac with a FireWire cable.
Make sure the source Mac (which needs to have the Retrospect engine installed) is turned on, then connect the FireWire cable from the target Mac to the source Mac. The hard disk of the target Mac will appear on the source Mac’s desktop, as if it were any other external drive.
In the Finder on the source Mac, Get Info on the target Mac’s volume you want to restore and ensure that the “Ignore ownership on this volume” option is unchecked. Otherwise, Retrospect will not be able to restore file and folder permissions properly on the target disk.
Start the Retrospect console.
(Optional) If your Catalog files are not available, rebuild the necessary Catalog from your backup media. See “Rebuilding a Media Set,” in Chapter 7, for detailed instructions. If you copied your Catalog files from backups, you must get Retrospect to recognize them. From the Media Sets category, click Locate, navigate to the location of the Catalog file, and click OK to add the catalog to the list of available Media Sets.
In the Retrospect toolbar, click Restore. The Restore Assistant window appears.
Choose “Restore an entire source volume or favorite folder to a previous point in time,” then click Continue. The Select Backup pane appears.
Choose the backup that reflects the point in time to which you want to restore.
Click the radio button next to the name of the destination volume, then click Continue. The Restore Options pane appears, recapping the source and destination of the copy.
When you are ready to perform the restore, click Start Now.
When the restore is complete, eject the Target Disk Mode Mac’s disk and start it up normally.
In this method of disaster recovery, you will start up the Mac using your previously prepared Emergency Tools hard drive. Follow these steps:
Connect your Emergency Tools hard drive to the Mac you want to restore. Turn on the drive and then start the Mac. Since the Mac should not have an operating system, the Mac should find and boot from the Emergency Tools hard drive. If necessary, hold down the Option key on the keyboard to choose which disk will be used as the startup disk.
Launch Retrospect and add the catalog file for the Media Set that you want to restore from.
In the Retrospect toolbar, click Restore. The Restore Assistant window appears.
Choose “Restore an entire source volume or favorite folder to a previous point in time,” then click Continue. The Select Backup pane appears.
Look through the list of backups until you find the backup that reflects the point in time to which you want to restore. When you have found and selected the backup you want, click Continue. The Select Destination pane appears.
Click the radio button next to the name of the destination volume on the client to be restored, then click Continue. The Restore Options pane appears, recapping the source and destination of the copy.
When you are ready to perform the restore, click Start Now.
When the restore is complete, shut down the Mac by choosing Shut Down from the Apple menu.
Disconnect the Emergency Tools disk, then start the restored Mac normally.
A live restore is any time you restore over a Mac’s current, in-use startup disk. It is used any time that you need to restore a functioning Mac to a previous point in time, and also when you don’t have a second computer or an Emergency Tools startup disk to help perform the restore. Follow these steps:
If the Mac won’t boot, install Mac OS X on the target Mac. The version of the operating system must be the same as the version on the backed-up data. If you are forced to install a later version of Mac OS X, see the instructions under “What to do if the OS on the new Mac is newer than the backed-up OS,” later in this chapter.
On macOS 10.11 and later, follow the steps earlier in this chapter under "Workflow for macOS El Capitan and Higher."
Install the Retrospect Client software on the target Mac.
On the Retrospect server, log in the client to be restored.
In the Retrospect toolbar, click Restore. The Restore Assistant window appears.
Choose “Restore an entire source volume or favorite folder to a previous point in time,” then click Continue. The Select Backup pane appears.
Look through the list of backups until you find the backup that reflects the point in time to which you want to restore (usually the latest backup). When you have found and selected the backup you want, click Continue. The Select Destination pane appears.
Click the radio button next to the name of the destination volume, which is the startup volume of the target Mac client, then click Continue. The Restore Options pane appears, recapping the source and destination of the copy. Note that the warning message is different (“Warning: All other files on disk name will be deleted.”), indicating that if there are any newer files on the disk than those contained in the backup, those newer files will be deleted.
When you are ready to perform the restore, click Start Now.
When the restore is complete, restart the Mac by choosing Restart from the Apple menu. Upon restart, the Mac will be in the restored state.
If you have been using Retrospect’s Copy/Replication operation, disaster recovery can be quite simple. By definition, a Copy script creates an exact copy of all the files on the source disk onto another hard disk, so that disk is bootable. By starting up the replacement Mac from the disk that contains the copy, you can get back to work immediately; the only drawback, as with any backup, is that files created or changed since the last time the copy was made will remain unavailable.
Most of the time, you will be performing Copy operations onto single external hard drives (though it is certainly possible to use more exotic hardware setups, such as enclosures with multiple drives). To restore to the internal drive of the repaired Mac, follow these steps:
Connect the hard drive containing the copy to the Mac you want to boot and restore.
Turn on the external drive and then turn on the Mac. If the Mac has an operating system installed, hold down the Option key as you turn it on. This will launch the Startup Manager and display the available volumes from which you can start up.
Use the left and right arrow keys on the keyboard to select the volume you would like to use, in this case the external drive containing the copy backup.
Press the Return key on your keyboard to start the computer from the volume you selected.
Once the startup process is complete, you may use the computer while booted from the backup disk.
Use Retrospect’s Copy Assistant to copy the backup disk’s contents back to the internal drive, replacing any files that might be on the internal drive. See “Using the Copy Assistant” in Chapter 5 if you need detailed instructions.
You may be faced with a situation where you have multiple backups of the Mac that needs disaster recovery: a fairly recent copy, and an even more recent regular backup. In this case, you would ideally want to use the copy to restore the target Mac quickly, then you want to use the newer files in the regular backup to restore the latest versions of files, applications, and user settings.
To accomplish this kind of restore, follow the steps earlier in this chapter, first under “Start up and restore from the copy,” then under “Doing a live restore.”
In some situations, you may be required to restore to a target Mac that must use a newer version of Mac OS X than the old Mac that was backed up. In this case, you have two options:
Restore the most recent backup of the old Mac to an external hard disk drive, and then use the new Mac’s Migration Assistant application to copy the apps and user data over from the external drive. (The best results will be achieved with this method.)
Use Retrospect’s “Restore selected files and folders” option to hand-pick items for restore (this method is tedious, so it’s better to buy an external hard disk drive and proceed with method #1). If you need information on restoring selected files and folders, see “Using the Restore Assistant to Find and Restore Files and Folders” in Chapter 5.
The following steps are to restore specific files and folders onto a functioning remote Windows system. For a disaster recovery scenario, live restores are not recommended in modern Windows OSs, and you should perform a Windows DR bare metal restore. See the Windows User Guide.
Add the Windows client.
In the Retrospect toolbar, click Restore. The Restore Assistant window appears.
Choose “Restore files and folders” then click Continue. The Select Backup pane appears.
Look through the list of backups until you find the backup that reflects the point in time to which you want to restore. When you have found and selected the backup you want, click Continue. The Select Destination pane appears.
Click the radio button next to the name of the destination volume, then click Continue. The Restore Options pane appears, recapping the source and destination of the copy.
When you are ready to perform the restore, click Start Now.
The following instructions describe how to restore an entire volume on a Linux client over the network. These instructions assume that you have a newly erased disk that has had installed a fresh copy of the Linux operating system distribution.
You must first get the client computer operating with the network before performing the actual restore operation from the backup computer.
The steps below involve completely replacing the contents of a client computer’s hard drive with a previous backup in which you backed up “all files.”
Install new Linux operating system software on the newly-formatted hard disk, making sure to create the same mount points as the original system. Restart from this volume.
Use the Setup program to install the Retrospect client software as described in “Installing Retrospect Client software on a machine running Linux” in Chapter 1.
From the Sources category of the Retrospect console, Remove the old Linux client, then Add the new client.
In the Retrospect toolbar, click Restore. The Restore Assistant window appears.
Choose “Restore an entire source volume or favorite folder to a previous point in time,” then click Continue. The Select Backup pane appears.
Look through the list of backups until you find the backup that reflects the point in time to which you want to restore. When you have found and selected the backup you want, click Continue. The Select Destination pane appears.
Click the radio button next to the name of the destination volume, then click Continue. The Restore Options pane appears, recapping the source and destination of the copy.
When you are ready to perform the restore, click Start Now.
Restart the client computer.
The installation process for Mountain Lion and Lion modifies the Mac's startup disk to add a hidden “Recovery HD” partition that can be used to start up the Mac in the event of a problem with the primary startup volume. This partition is not visible in Retrospect or Disk Utility.
Retrospect users should be aware of the following information regarding the Recovery HD partition:
The creation of this partition changes the size of the startup volume, so Retrospect may show the startup volume twice in the Sources view following an upgrade to Lion or Mountain Lion. If this happens, remove the original volume from the Sources list and redefine any favorite folders.
If the disk containing the Recovery HD partition is repartitioned and erased with an application like Disk Utility, or if a new hard drive is installed, the Recovery HD partition will no longer be present. Running the Mac OS X installer on this disk will recreate the Recovery HD partition.

