This chapter provides instructions on configuring and administering the Retrospect Client software that allows you to access networked Retrospect client computers from the backup server. It also describes the options and controls available to Retrospect clients. In addition, this chapter explains how to add other networked resources, such as servers and network shares, to Retrospect to be backed up. Finally, you’ll find advice about how to best set up your network backups.
Retrospect allows you to use one or more Retrospect server computers with attached storage devices to back up networked Macintosh, Windows, and Linux computers equipped with Retrospect Client software. You can also back up networked servers, such as machines running Mac OS X Server, Windows Server, or NAS devices, in two different ways, which will be explained later in this chapter. If you have more than one Retrospect server, you can conveniently administer them all from a single installation of the Retrospect console application.
To back up clients, first install the Retrospect Client software on each of the client computers. Then use the Retrospect console application to add those clients as sources for use by the Retrospect server. After configuring the clients, you can create and schedule scripts using client volumes as sources, as if the volumes were connected directly to the Retrospect server.
Retrospect will work with as many clients as you have licensed. You can add licenses to support more clients.
Retrospect’s license manager keeps track of your client licenses with the license codes you enter. Client license codes are included with most Retrospect for Macintosh products and are also available separately in Retrospect Clients Packs.
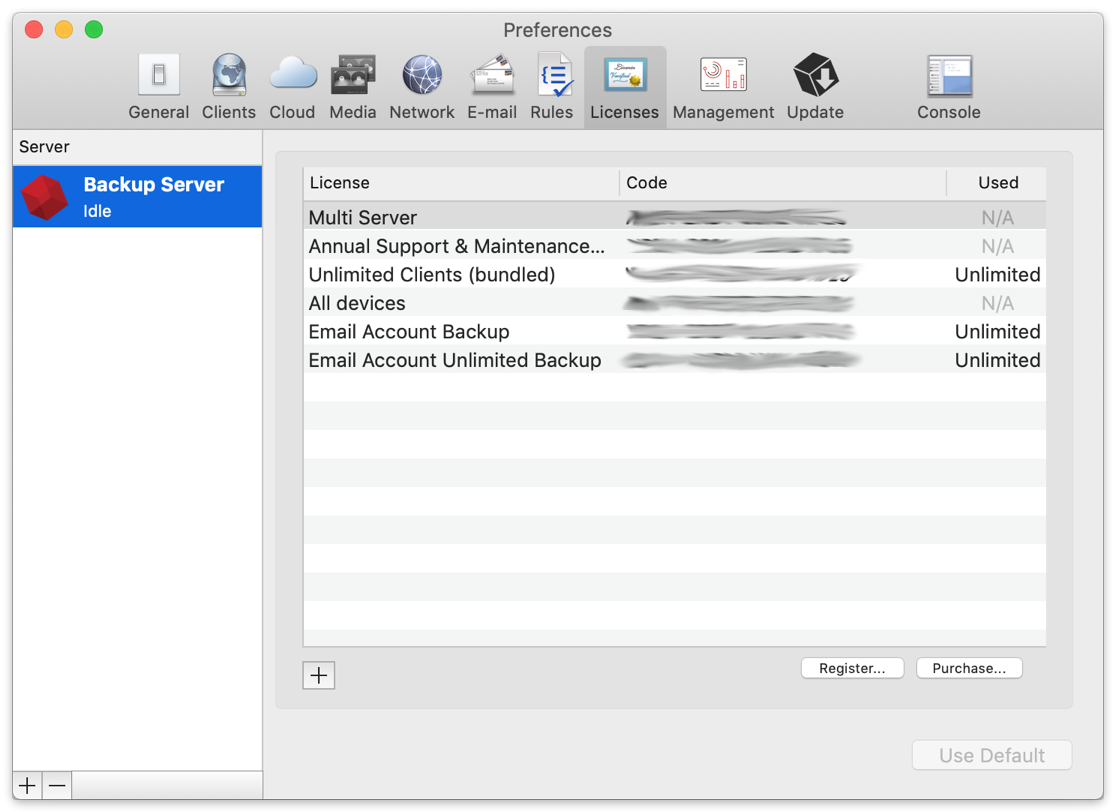
To view current licenses, choose Retrospect > Preferences, then click on the Licenses tab. If there is more than one server listed in the list on the left, click the server for which you wish to view the licenses. The list on the right shows the different licenses you have added, including client licenses, and under the Used column, shows how many licenses are in use.
Tip: Licenses are specific to a particular Retrospect server, so if you have more than one server, each server will be running entirely different sets of licenses. For example, if only one of your Retrospect servers has a tape library attached to it, you only need to purchase the Advanced Tape Support license for that server.
To add a client license, click the Plus (+) button below the license list and enter your new license code in the dialog that appears. To purchase additional client licenses, click the Purchase button below the list.
The subject of installing Retrospect Client software on your Macintosh, Windows, or Linux computers is covered in Chapter 1. Please refer to that discussion.
When backing up network clients, Retrospect needs certain network access that is not enabled by default with most firewalls.
Retrospect uses port 497 for both TCP and UDP communications. To successfully find and access Retrospect clients, your firewall needs to be set to allow communication over port 497 for both TCP and UDP on all Retrospect clients as well as on the Retrospect backup server.
On Macintosh, you control the Mac OS X firewall settings in System Preferences > Security > Firewall.
The default setting for the firewall is “Allow all incoming connections.” If you install the Retrospect client with this setting enabled, Retrospect should always be able to communicate with the client.
Warning: If the firewall is set to the “Allow only essential services” setting when the Retrospect client software is installed, or is changed to the setting after the client is installed and has been added to Retrospect’s Sources, Retrospect will not be able to communicate with the client.
With the “Set access for specific services and applications” setting, the Retrospect Client software installer will work with the firewall to open the required ports so that Retrospect can communicate with the client.
On Windows, if you are using the Windows XP SP2 (or later, including Windows Vista and Windows 7) Firewall, Retrospect automatically opens these ports if the firewall is enabled when Retrospect is installed. Otherwise, you must open the ports manually. See your Windows documentation for information on enabling firewall exceptions.
Retrospect allows you to create highly encrypted private and public key certificate files for your Retrospect Clients. These certificates can then be used to automatically log in clients to the server. This is the recommended method, but you can also enter individual passwords for each Retrospect Client. If you choose to use individual passwords, you will be prompted to enter those passwords when you install the Retrospect Client software.
Public/Private Key is a method by which Retrospect Clients running Mac OS X 10.4 or later can be logged into a Retrospect server automatically through use of matching encryption key sets. To use this feature, follow the steps below.
Launch the Retrospect application and choose Retrospect > Preferences > Clients.
Click “Create keys…”, enter a password of eight characters or more for key creation, then click Create. Retrospect may take up to a minute or more to generate the keys, depending on the speed of the computer.
If you want Retrospect to automatically log in clients with the proper public key, check “Automatically add clients”. This is recommended. The Retrospect server will then periodically check the network for new clients with the matching public key and automatically add them to Retrospect’s Sources list. Clients so added will be tagged with the “Automatically Added Clients” tag, providing both a place to look in Retrospect for automatically added clients and also a way to create a script that will use the tag to automatically back up such clients. (For more information on tags, see the section on Tags in Chapter 3.)
From the Retrospect Installer disk image or CD, open the Client Installers folder, then copy the Mac Client Installer folder onto your hard drive.
In the Finder, locate the pubkey.dat file in /Library/Application Support/Retrospect/ and copy it into the folder named “public_key” inside the Mac Client Installer folder on your hard drive.
Distribute or copy this public_key folder containing the pubkey.dat file along with the Retrospect Client installer. As long as the public_key folder is located at the same level with the Client installer when the installer is run, the proper encryption keys (pubkey.dat, pubkey1.dat, pubkey2.dat,…,pubkey9.dat) will be installed on each client.
After installing the Retrospect Client software on each computer, they can be logged in (or will be automatically logged in, if that option was set) at the Retrospect server.
If your backup computer has multiple network interfaces, the Retrospect application and Retrospect Client software automatically switch to the next available network interface if the primary interface is not available.
Mac OS X’s Network System Preferences allow you to specify the order in which you want to try different network interfaces when connecting to a network.
For more information about configuring network interfaces, see “Advanced Networking,” later in this chapter.
After you have installed the Retrospect Client software on the machines on your network that you want to back up, you must next add those clients to Retrospect’s Sources. Clients can be Mac, Windows, or Linux machines.
To add networked clients, follow these steps:
In the Retrospect console, click on Sources in the sidebar. If this is the first time you are adding clients, only the local hard disks on the Retrospect server appear in the Sources list. These local hard disks will often be the eventual destinations for your backups.
Click the Add button in the List View toolbar. The Source dialog will appear.
If you have more than one network interface, choose the one you wish to use from the “Sources from interface” pop-up menu. Retrospect will search the network for active clients, and they appear in the Source list. If you have set up Retrospect and the Retrospect Client machines to use private/public key authentication, and to add clients automatically, Retrospect will do so without prompting you for a password. Skip to step 6.
Click to select a client in the list. If you want to select multiple clients, to which you have assigned the same password, hold down the Command key and click on each client in the list, or click then Shift-click to select a contiguous group.
Click Add. If you are not using private/public key authentication, Retrospect will ask you for the password for the client. Enter the password, and click OK. Repeat the process for any remaining clients you wish to add. Retrospect adds the clients to the Sources list, behind the Source dialog. If you have added all the clients you want, click Done to dismiss the Source dialog.
(Optional) Sometimes, available clients won’t appear automatically in the Source dialog, perhaps because they are outside of the local subnet. You can add these clients manually by clicking the “Add Source Directly” button at the bottom of the Source dialog. Retrospect will display a dialog asking you for the IP address (or DNS or machine name) and password of the client. Enter that information, then click the Add button in the dialog. If Retrospect successfully connects to the client, you will see a green icon, and the client will be added to the Sources list. Click Done to dismiss the “Add Source Directly” dialog, then click Done again to close the Source dialog.
Once you are done adding clients, they appear in the Source list, initially as icons with the client machine’s names. Click the disclosure triangle next to a machine name to display all of the disk volumes connected to that machine.
In order to backup a Retrospect client machine, Retrospect naturally has to maintain a connection between the Retrospect server and the client. Retrospect provides three ways to test and maintain that connection: Refresh, Locate, and Test Address.
First, you can test that a machine with the Retrospect client software that you have previously added to Retrospect’s Sources is still reachable using the Refresh function. Follow these steps:
In the sidebar, click on Sources.
In the Sources list, click to select a Retrospect client machine. To make it easier to find the client machine you are looking for, click the Client button in the Scope Bar, which will make the Sources list only display Retrospect clients. Make sure you click the icon for the machine, not one of that machine’s volumes or Favorite Folders.
Click Refresh. Retrospect will search for the client machine. If the search is successful, Retrospect will update the information on the client machine in the Summary tab of the Detail view. If the client’s volumes have changed, they will also be updated in the Sources list. If the client cannot be found on the network, Retrospect will display a dialog telling you so.
In some unusual situations, Retrospect can have difficulty finding a client. For example, if you add a client using a specific IP address, and that IP address changes, Retrospect may not be able to find the client. In this case, use the Locate feature. Follow these steps:
In the sidebar, click on Sources.
In the Sources list, click to select the Retrospect client machine you wish to locate.
Click Locate. Retrospect will display a dialog similar to the one for adding a client. Locate the client and click Locate.
You can test for a responding client at a known IP address, DNS name, or local hostname (found in the Sharing panel of System Preferences, with the name in the format computer name.local). Follow these steps:
In the sidebar, click on Sources.
Click the Add button in the toolbar. The Add Source dialog appears.
Click the Test Address button. In the resulting dialog, enter an IP address, DNS name, or local hostname, and click Test. If Retrospect Client software is found at the specified address, Retrospect reports its client name, address, and client software version. If a computer is found at the specified address, but it is not running Retrospect Client software, or if no computer is found at the address, Retrospect reports an error in the dialog.
After a client has been logged in, there may come a time when you no longer need it in the Sources list (for example, if the client computer is removed from the network.). In this case, you can tell Retrospect to remove it.
In the Sources list, select the client and choose Remove from the toolbar.
Retrospect asks you to confirm the operation. By clicking OK, you are removing the client volumes from scripts and other lists in Retrospect. This only affects Retrospect on the Retrospect server in use at the time. It does not affect other copies of the Retrospect server running on other computers on the network, which remain logged in to the client as usual. Removing a client does not affect that client’s existing backups.
Removing a client makes one more client license available in the Licenses pane of Retrospect’s Preferences.
In the Retrospect console, you can view status and other information about any client that appears in the Sources list. You’ll find that information in the Detail view underneath the Sources list.

The Overview section of the Summary tab view includes the following information:
Client Name is the given client name. This is taken from the client computer, unless you have renamed the client with the Rename button in the Sources toolbar.
Type indicates Desktop or Server.
File System is only active when you have selected a client volume, and lists the file system used by that volume (for example, Mac OS Extended or NTFS).
Path is only active when you selected a client volume or Favorite Folder, and shows the directory path to the selected item.
Last Backup Date shows the last time Retrospect backed up the selected item.
Next Backup Date shows the next time Retrospect is scheduled to backup the selected item.
Status indicates the client’s availability for backups and other operations.
![]()
Backed Up means the client has been backed up according to a schedule in Retrospect.
![]()
Busy means the client is currently being accessed by Retrospect.
![]()
Locked means the user at this client workstation has checked the “Read Access Only” access preference in the client control panel. (The client can be backed up, but you cannot restore to it or delete files from it.)
![]()
Offline means the client is not visible to Retrospect, either because it is shut down, off the network, or does not have the client software running.
![]()
Ready means the client is a source in a script, but has yet to be backed up by Retrospect.
![]()
Unprotected means that Retrospect has never backed up the selected item.
Version is the version number of the client software installed on the client computer.
The Details section of the Summary tab view shows the following information:
Total Space shows the total size of the volume, when you have selected a client volume.
Used Space shows how much space on the volume is in use, when you have selected a client volume.
Free Space shows how much space is available on the volume, when you have selected a client volume.
Security shows the kind of security being used by the client. It will show either None, Password or Public/Private Key. This will also show if the client has the “Encrypt Network Link” option selected (in the Options tab).
Interface is the network interface assigned to the client.
Address is the IP address of the client.
Speed is the transfer rate of the network connection between the backup computer and the client computer.
Echo Time is the time delay, in milliseconds, experienced in communicating with this client, typically under 200ms. If the network or client is busy, or you are using routers, the echo time could easily be higher without indicating a problem.
Clock Offset is the difference in time between the internal clock of the client computer and the Retrospect server.
As client software is improved, new versions will be made available for download from the Retrospect website. You can then update clients either from the Retrospect server, or from individual clients.
To update a client from the Retrospect server, follow these steps:
In the sidebar, click on Sources.
In the Sources list, click to select the Retrospect client machine you wish to update. To update multiple clients, hold down the Command key and click on each client in the list, or click then Shift-click to select a contiguous group.
Click the Update button in the toolbar. Retrospect asks you to specify the location of the Retrospect Client update (.rcu) file. There are different client update files for different operating systems: Mac OS X, Windows, and Linux. Different client update files may be available from different places such as the Retrospect CD and the Retrospect website.
Select the appropriate client update file, wherever it may be, and click Update. After your confirmation, Retrospect begins updating the client software on the client computers. If you have different types of clients, repeat these steps for each type.
NOTE: You can find the RCU file on the Retrospect website under Downloads for a respective platform’s client. You can also export it from Preferences > Console > Export Client Installer.
When the update is complete, Retrospect reports the results in the Operations Log.
If you do not want to update clients from the Retrospect server as described above, you can update clients directly from the individual client computers. This is done with the Client Installer application (Mac OS X), Setup application (Windows), or tar installers (Linux), which can also update clients.
Follow the installation instructions (see Chapter 1) appropriate for the computer’s operating system. If you are using Public/Private encryption key pairs, remember to include the proper pubkey.dat file in the Retrospect Client installer’s public_key folder before running the Client installer.
If you want to remove the client software from a computer, forget the client as described in “Removing a Client,” earlier in this chapter. Then see the following sections for each type of client:
Mac OS X
Windows
Linux
Locate your Retrospect disk image or CD and navigate to
/Client Installers/Mac Client/.
Copy the Mac Client Uninstaller to the Macintosh on which you want to uninstall the Retrospect Client software.
Open the Mac Client Uninstaller and follow the on-screen instructions to uninstall the Retrospect Client software.
From the Start menu, choose Settings > Control Panel (Windows XP) or Control Panel (Windows Vista and Windows 7).
Double-click Add/Remove Programs (Windows XP) or Programs and Features (Windows Vista and Windows 7).
In the window that appears, select the Retrospect Client software and click Change/Remove (Windows XP) or Uninstall (Windows Vista and Windows 7).
The process for uninstalling the Linux client varies depending on how the client software was installed.
For tar, manually remove the client software files installed by tar.
All versions of Retrospect (with the exception of the Desktop version) can backup Mac OS X Server or Windows Server machines. And all versions can use Network Attached Storage (NAS) devices as a Source. You add the network share to Retrospect’s Sources list by specifying the server’s name or IP address, and entering valid login credentials.
To add a network share or NAS to the Sources list, follow these steps:
Click on Sources in the sidebar. The local hard disks on the Retrospect server and Clients that you have previously added appear in the Sources list.
Click the Add button in the List View toolbar. The Add Source dialog appears.
At the bottom of the Source dialog, click “Add Share.” A dialog appears asking for the server’s credentials. You must enter a URL for the network share, beginning with the abbreviation for the file sharing protocol used by the share. Use afp:// if the share uses the Apple Filing Protocol; use smb:// if the share uses the Server Message Block protocol commonly used by Windows computers (Mac OS X machines can also connect to SMB networks). Follow the protocol abbreviation with the name (preferred) or IP address of the share, then a slash, then with the directory name of the shared volume. If the computer to which you’re connecting does not have its name assigned by a DNS server, you will need to add the .local domain, such as
afp://serverName.local/shareName.
Enter a username and password for the network share, then click Add. If the information you entered is correct, Retrospect displays a green icon next to the Add button. The network share will also be added to the Sources list behind the dialog. If not, you’ll get a red icon, and you should check and renter the information.
Click Done to exit the credentials dialog, then click Done again to exit the Source dialog. You’ll see that the network share has been added to the Sources list.
Network shares can be backed up or used as a backup location. Retrospect supports AFP, SMB, and WebDAV shares. Identifying shares and adding them to your projects is now easier than ever.
Click Sources > Add > Share. Enter the share address and any required log-in information.
Click Media Sets > Add > Share. Enter the share address and any required log-in information.
Retrospect Client software allows individual users to control aspects of the backup and restore operations performed on their computers. The client software has been redesigned for Windows and Mac OS. The changes include:
An updated user interface with Windows taskbar and Mac menu bar integration
User-initiated backups and restores
Better-organized preference panels with enhanced options
Link encryption employs strong AES-256 encryption
Note: The Retrospect system administrator has the ability to restrict access to some of these features. For more information, see Locking client features and preferences.
Users now have the ability to restore files and request backups directly from their desktop. When the Retrospect Client software is installed, a Retrospect icon is added to the Windows taskbar and Mac OS menu bar. Click the icon to open a menu you can use to initiate a backup or restore operation.


This backup method is best if you need to quickly protect a specific file or folder. It is not meant to be a substitute for regular backups and cannot be used to perform a full system backup of your computer.
Click the Retrospect icon in the Windows taskbar or Mac OS menu bar.
Select Back Up Now.
Use the Backup Files and Folders dialog to select the items to back up.
Click Back Up.
Notes about user-initiated backups:
The Back Up Now and Restore Files menu items are inactive until the client computer has been logged into a Retrospect server where these options are activated.
Mac: By default, backed up files and folders are stored in a Media Set chosen by the system administrator in the Retrospect Client preferences. The Media Set is selected using the Back up on demand to popup list.
Windows: By default, backed up files and folders are stored in a Backup Set chosen by the system administrator in the Retrospect Client preferences. The Backup Set is selected using the Back up on demand to popup list.
Restores can be initiated from the client computer’s taskbar or menu bar or by clicking the Restore button on the Retrospect Client preference pane’s History tab.
Click the Retrospect icon on the client computer’s taskbar or menu bar.
Select Restore Files .
In the Restore Files and Folders window, select a backup from the menu that contains the files you would like to restore.
Select the files to restore.
Click Restore .
To choose a different location, click Browse . To continue, click Restore .
Click on the Retrospect menu icon on the menu bar. Select Open Retrospect Client Preferences.
Click System Preferences in the Dock. Click the Retrospect Client icon.
From the Apple menu, choose System Preferences. Click the Retrospect Client icon.
Click Start > Programs (or All Programs) > Retrospect > Retrospect Client.
From the Windows taskbar, click the Retrospect Client icon and select Open Retrospect Client Preferences.
Preferences are grouped into the following categories: Status, History, Notifications, Privacy, and Schedule. Click one of the category buttons to access the settings.


Protected by Retrospect Server : ** Use this option to disable access to the client by the backup computer.
Client Name : The client name and the client IP address being used by Retrospect are displayed here.
Status area : Information about your latest and next backups are displayed. If a backup is running, a progress bar is shown.
History area : Your disk-based backups are listed here. In each row you will find information about the backup and a Restore button. A green icon indicates the backup completed successfully. A yellow icon indicates there was a problem with one or more files in the backup. A red icon indicates the backup failed. To start a restore operation using one of these backups, click the corresponding Restore button.
Notify after backup : Displays a message after the completion of a backup or other operation.
Notify if no backup in N days : Displays a message if the client has not been backed up within the number of days specified in the entry box.
Report SMART errors : Requests an immediate backup from ProactiveAI Backup (if applicable) when Retrospect learns of errors on the client’s SMART hard drive volumes. This setting is off by default.
Privacy area : This area displays any files or folders designated as Private. Private files are not visible to the Retrospect server and are not backed up. Drag volumes, files or folders to this panel to designate them as Private.
Add/Remove buttons : To add files or folders to your Privacy list, click the Add button and navigate to the files or folders you wish to add. To remove an item from your list, select it in the Exclude area, and click the Remove button.
Allow Retrospect to change files on my system (Required for restore): When this option is unchecked, the client can be backed up, but files on the client cannot be restored, modified, or deleted by the backup computer. This setting is on by default.
Delay ProactiveAI Backups until after [date & time] : Prevents the backup computer from backing up the client computer before the specified time and date, up to one week from the present time. (Click on the time and date or click the arrows to make changes.)
The Retrospect system administrator has the ability to prevent users from changing certain client settings. For instance, you may not want users to prevent their computers from being backed up.
The most efficient workflow for a system administrator is to establish a set of standard lockout preferences, and then make any desired customizations on a client-by-client basis. The steps below explain how to do this.
The lockout controls are in the Retrospect console. Mac: Choose Retrospect > Preferences > Clients tab. Windows: Choose Configure > Preferences > Allow Clients to in the Retrospect console sidebar.
In the Allow Clients to section, modify one or more of the following preferences:
Turn off the Retrospect Client software : When checked, this preference allows users to hide their client from the Retrospect server. All communication between the server and the client will be cut. Any backups scheduled to run while the client is turned off will be skipped.
Stop running backups : When checked, this preference allows client users to stop operations that are in progress.
Exclude items from backups : When checked, this preference allows users to mark files, folders, and volumes as Private, making them invisible to Retrospect.
Set read access only : When checked, this preference allows clients to prevent Retrospect from writing to or deleting files on their computer.
Back up on demand to : When checked, this preference allows clients to initiate on-demand backups to the Disk Media Set selected in this popup menu. When checked, this preference allows clients to initiate on-demand backups to the selected Backup Set. Click Select Backup Set… to choose a Backup Set.
Restore on demand : When checked, this preference allows clients to initiate on-demand restores from available Backup Sets. When checked, this preference allows clients to initiate on-demand restores from available Disk Media Sets.
Mac: Select Sources in the Retrospect console sidebar. Windows: Select Configure > Clients in the Retrospect sidebar.
Select a client from the list.
Mac: Click the Details > Options tab. Windows: Click Properties.
Modify the preference settings as desired for this client.
Retrospect normally uses its multicast access method to find backup clients directly connected to the local network segment or local subnet, and display them in the Add Source window. You will need to use Retrospect’s more sophisticated techniques of accessing clients if your network has routers between the backup computer and its clients, or if your backup computer has multiple network cards connected to different physical networks.
Retrospect has the ability to use several different methods of accessing clients. It also lets you control the use of adapter cards in the backup computer.
Retrospect can either use the standard DNS and WINS directory services, or its own Piton Name Service based on TCP/IP.
Adding a client to Retrospect’s Sources also stores its access information for later use. When Retrospect tries to connect to the client for a backup, it resolves the access information into its current IP address using the original access method.
On each client computer, Retrospect Client software waits for queries from Retrospect on the Retrospect server. Just exactly how Retrospect gets in touch with the clients depends on the access method Retrospect is using.
The three available methods in the Add Sources dialog are:
Multicast
Subnet Broadcast
Add Source Directly
When you first open the Add Sources dialog, the default access method from the pop-up menu is “Use multicast.” With this method, Retrospect sends out a multicast request to the listening client computers, asking them to respond with their identities. After you have added a client with this method, when Retrospect later tries to connect to the client for a backup, it handles IP address changes automatically by sending out another request to update its client database and connect with the proper client.
If you use a network analyzer to monitor the packets it sends with the multicast method, you will see Retrospect uses well-known port 497 for its communications. The packet format conforms to the proprietary Retrospect protocol Piton (for PIpelined TransactiONs), which gives Retrospect much of its network speed and reliability. Multicast Piton Name Service uses the assigned address 224.1.0.38, which allows Piton to direct its queries only to those computers running Retrospect Client software.
Multicast access is simple, requiring no configuration, but does not operate across routers. It works only in the local subnet.
The subnet broadcast access method allows you to access clients through virtually any network topology, including the Internet.
According to TCP/IP standards, every subnet has both a network address and a subnet mask, such as 192.168.1.0 and 255.255.255.0. Routers use these to identify the physical network to which computers are connected. Routers also support queries to all the computers on a particular subnet. Retrospect takes advantage of this ability for its subnet broadcast access method, using the same Piton protocol as for multicast access.
With Retrospect’s subnet access method, you must define the address and mask of each subnet you wish to use, and update these configurations if your network changes. See “Configuring Network Interfaces and Subnets,” later in this chapter to learn how to define subnets.
You can use the Add Source Directly client access method to add a specific backup client to Retrospect’s Sources. This method requires you to know the IP address or DNS or WINS name of each backup client. Do not use a numeric IP address for computers which get a dynamic IP address from a DHCP server, because Retrospect has no way to learn when the address changes.
Adding clients directly is most useful for a few clients; adding many will be tedious. One of the other methods would probably be better for adding numerous clients.
To add a client to Sources directly, follow these steps:
In the Retrospect console, click on Sources in the sidebar.
Click the Add button in the List View toolbar. The Add Sources dialog will appear.
At the bottom of the Add Sources dialog, click Add Source Directly. In the resulting dialog, enter the IP address (or DNS or WINS name) and password of the client, then click Add. If Retrospect finds a client at the specified IP address, it displays a green icon in the dialog. Repeat the process for any remaining clients you wish to add directly. Retrospect adds the clients to the Sources list, behind the Source dialog. If you have added all the clients you want, click Done to dismiss the Source dialog.
Retrospect’s interface feature allows you to choose among multiple adapter cards and control networking options for groups of backup clients. For example, a custom interface lets you back up clients on different subnets without requiring backup data to cross routers, conserving network bandwidth.
You can name and assign different network interfaces to specific network addresses in Retrospect’s preferences, which will use the addresses in order. To do this, follow these steps:
Choose Retrospect > Preferences > Network. If more than one Retrospect server appears in the Server column, select the server you want to control. In the connection list on the right side of the window, your Mac’s default network connect will appear.
To add another network interface, click the Plus (+) button below the connection list. In the resulting dialog, choose from the Connection pop-up menu the IP address of the network interface you want to use, then enter a name for the connection and click Add.
The new connection appears in the connection list. You can also restrict the subnet that Retrospect will use when it looks for clients and network shares. To do that, select one of the connections in the connection list, then click the Plus (+) button below the Details box. In the resulting dialog, enter the Subnet Address and Subnet Mask, then click Add. The subnet restriction will appear in the Details box.
Expert users may need additional control over Retrospect’s network behavior. Clicking the Advanced button in the Network preference pane brings up a dialog with various settings:

Network retry warning delay Retrospect displays its network retry dialog when a client does not respond in the specified time period.
Connection timeout The maximum amount of time that Retrospect will wait for a client to resume communication before logging an error –519 (network communication failed) and continuing to the next activity.
Search poll interval When a client is unavailable at its last known address, Retrospect sends queries at this interval.
Search timeout Retrospect terminates its search for a known client when it cannot find the client in the specified time period.
Live poll interval Retrospect broadcasts to clients at this time interval when it polls for clients in the live network window. If you configured multiple subnets for the interface, Retrospect divides the poll interval by the number of defined subnets.
Forget counter Retrospect removes a client from the live network window when it does not respond to the specified number of sequential polls. This does not affect clients already added to the backup clients database.
Multicast time-to-live Retrospect assigns this “time to live” number to multicast UDP packets. It is the maximum number of router hops a packet can make before it is discarded. An increase in the time to live number lets Retrospect search for clients on more subnets connected by IGMP capable routers. Routers which do not support IGMP will not forward the multicast UDP packets.
Enter a value next to the settings you want to change, then click Done. If you change your mind after you have entered a setting, click Use Defaults to undo your entries, then click Done.
Warning: Make changes in this dialog only if you know exactly what you’re doing, or at the direction of Retrospect tech support. Under some circumstances, changes in this dialog can adversely affect Retrospect performance. Be careful!
This section provides information and advice to help you set up a workgroup backup using Retrospect.
In general, the same principles that apply to local backups also apply to network backups of client computers. The major difference between a local backup and a network backup is the amount of data, which may overwhelm storage limitations. As a consequence of the sheer amount of data and the often slower speed of network backups, time may also impose limitations. If you can’t back up the entire network in a single night, you may want to consider splitting the backup over several nights, backing up only documents, or using ProactiveAI Backup scripts.
Although the information in this section can be applied to any local area network, the examples assume a basic Ethernet network installation. Most calculations will still apply if your network contains internetwork devices (such as routers or gateways), unless one or more members of the backup workgroup are separated from the rest by an internetwork device. Running backups through routers or gateways increases the time it takes to complete a backup.
The capacity of the backup device is usually the most important consideration for automatic, unattended workgroup backups. There is no such thing as too much capacity for network backups. More capacity almost always means you can back up more files from more volumes from more client computers, broaden the criteria for selecting files to be backed up, increase the amount of time between media changes, and increase the number of backup sessions per piece of media.
If your backup device does not have enough capacity, you will not be able to complete an automatic, unattended backup because you will have to change the media before the backup is finished. Depending on your capacity and speed needs, one or more high-capacity hard disks, a disk array, a tape library, or a Storage Area Network may be the right backup device for your organization.
This section offers some advice on how to select the correct computer for the Retrospect server to suit your planned network backups.
You don’t need to use a file server as the backup computer. The following table lists various advantages of using a desktop computer or a server as the backup computer.
You can use the computer closest to you for easy access to the backup devices.
Avoids expense of a dedicated server.
You can select the computer best suited in terms of memory and speed. Retrospect can be run at night or on weekends, allowing normal use of the computer during work hours.
Allows your server to run at full speed for those who are accessing it while the backup is running. This assumes that you don’t have a dedicated backup server.
Optimizes your backup speed since server computers are often a high performance model.
Takes advantage of the server’s inactivity during the nights and weekends.
Gains added security for your Media Sets if your server is located in a secure area.
Backs up large server disks using faster local transfer rates rather than the slower network transfer rates.
The performance of the backup computer often determines the performance of the entire system. Generally, a higher performance computer supports a network backup of more data from a larger number of client computers.
Software compression and encryption increase CPU use significantly. If you are considering using either of these features, choose a model with a more powerful CPU.
Make sure the backup computer has enough RAM to handle the network volume that contains the most files. Retrospect can use more execution threads to get your backups done faster if you add more RAM to the Retrospect server.
If the Retrospect server is not completing backups in its scheduled time periods or if you want volumes to be backed up more often than they are, you may need a faster backup computer or a faster backup device, or both.
Retrospect provides an encryption feature that lets you protect your data from unauthorized access as it is being backed up, and a compression feature that saves space on the backup device by compressing stored data. The decision to use one or both of these features can affect the type of backup device you choose. Keep in mind Retrospect’s encryption and software compression will slow backups, especially when using a computer with a slow CPU. A tape drive that supports compression will perform the task of compression itself, and because it uses dedicated compression hardware, it compresses data faster than Retrospect. Use the following table to determine whether to use compression and encryption and whether a compression tape drive is appropriate to use as the backup device.
Description: Allows the backup device to store more files on its media.
Procedure: Finds patterns in the data; the more patterns, the greater the compression.
Implementation: If you have a tape drive that offers compression, Retrospect leaves the task of compression to the hardware since it compresses data faster than Retrospect.
Description: Adds security to your backup.
Procedure: Randomizes the appearance of data to prevent unauthorized access.
Implementation: Retrospect always manages encryption.
Description: Allows the backup device to store more files on its media and adds security to your backup.
Procedure: Compression must take place before encryption.
Implementation: Retrospect must perform both functions. If you have a compression drive, you must choose between using encryption or using hardware compression because you cannot use both. (Retrospect automatically disables hardware compression when you use encryption.)

