

$ tar -xf Linux_Client.tar
$ ./Install.sh
This chapter first describes the different editions of Retrospect, then defines the program’s hardware and system requirements. Next, you’ll see how to install Retrospect’s components, and how to upgrade from previous versions of Retrospect. Finally, there’s a basic overview of Retrospect’s console, which is the user interface you’ll be working with the most.
To backup and restore data, Retrospect uses three software programs:
The Retrospect engine is the backup and restore software running on the Retrospect server, which is the computer that has the storage devices attached to it. The Retrospect engine runs in the background on the Retrospect server. If you have more than one Retrospect license, you can control multiple Retrospect servers from a single user interface.
The Retrospect console, also called the Retrospect application, provides the user interface with which you control the functions of the program. You’ll use this to create immediate or scripted backups; restore backed up files and folders; monitor running backup and restore activities; get reports of recent and scheduled activities; and much more. The Retrospect console doesn’t have to be installed on the same computer as the Retrospect engine. If you have a larger installation with more than one Retrospect server on your network, you can administer all activities on each server from a single Retrospect console.
The Retrospect Client software must be installed on every computer on your network (Mac, Windows, or Linux) that you wish to back up to the Retrospect server. The Client software allows Retrospect to copy and restore data across the network, as though the client computers’ drives were connected directly to the Retrospect server.
Retrospect is licensed in four main ways:
Multi Server – Protege qualquer número de servidores, computadores de mesa e notebooks Windows, Mac e Linux em rede de um único computador host executando o Retrospect. Suporta dispositivos de armazenamento em disco, nuvem e fita.
Single Server Unlimited – Protege um servidor e qualquer número de desktops e notebooks Windows, Mac e Linux em rede de um único computador host executando o Retrospect. Licenças de cliente de servidor adicionais podem ser adquiridas para proteger mais servidores Windows, Mac ou Linux em rede. Suporta dispositivos de armazenamento em disco, nuvem e fita.
Single Server 20 – Protege um servidor e até 20 desktops e notebooks Windows, Mac e Linux em rede a partir de um único computador host executando o Retrospect. O Cliente do Retrospect e as licenças do cliente de servidor adicionais podem ser adquiridos para proteger mais sistemas. Suporta dispositivos de armazenamento em disco, nuvem e fita.
Single Server 5 – Protege um único Mac Server e cinco estações de trabalho usando armazenamento local, em rede e baseado em disco na nuvem.
Desktop – Protege um único Mac sem servidor e até cinco desktops e notebooks adicionais para Windows, Mac e Linux.
A number of advanced Retrospect features are only available if you have the appropriate license code. To view your current licenses, or to purchase additional licenses, choose Retrospect > Preferences, then click the Licenses tab.
Abrir backup de arquivos ilimitado – Protege arquivos abertos em volumes formatados em NTFS em servidores, desktops e laptops do Windows. Esse complemento possibilita a proteção de aplicativos de linha de negócios - como contabilidade, CRM e sistemas de banco de dados proprietários - enquanto eles estão em execução, mesmo aqueles com arquivos de dados espalhados em vários volumes. Backup de arquivo aberto do Retrospect O complemento ilimitado se estende a todos os sistemas Windows protegidos por seu servidor host Retrospect, incluindo desktops e laptops de usuários finais.
Suporte Avançado de Fita – Melhora o tempo de backup utilizando várias unidades de fita em paralelo, incluindo várias unidades independentes, unidades em bibliotecas ou unidades em autocarregadores. O complemento Advanced Tape Support é licenciado por servidor host do Retrospect, não por unidade de fita. Por exemplo, apenas uma licença de complemento do suporte de fita avançada é necessária para uma biblioteca com quatro mecanismos de unidade de fita.
Pacotes de Cliente do Retrospect – Estende o número de desktops e notebooks em rede que podem ser armazenados em backup usando as edições do Retrospect Disk-to-Disk ou Desktop. Disponível em 1, 5 e 10 pacotes de licença de cliente.
Cliente do Servidor do Retrospect – Estende o número de servidores em rede que podem ser armazenados em backup usando as edições do Retrospect Single Server. Cada Retrospect Server Client adiciona uma licença para proteger um servidor adicional como um cliente de rede.
Suporte Anual e Manutenção (ASM) – Fornece suporte técnico via e-mail e telefone (disponível em regiões selecionadas) e todas as atualizações / atualizações do produto adquirido sem custo adicional por 1 ano a partir da data de compra do ASM.
* O Retrospect Desktop não é executado no Mac OS X Server.
Hardware Suportado:* O backup de clientes de SO do servidor requer o Retrospect Multi Server ou outra edição do servidor com licenças de cliente de servidor disponíveis.
Hardware Suportado:*O backup de clientes de SO do servidor requer o Retrospect Multi Server ou outra edição do servidor com licenças de cliente de servidor disponíveis.
O Retrospect oferece suporte a uma grande variedade de dispositivos de armazenamento como destino de backups, incluindo discos rígidos (conectados à rede e diretos), unidades de fita e bibliotecas, armazenamento flash e unidades de disco removíveis (RDX, REV etc.). Veja o <a href="/br/support/device_database">Banco de dados de suporte a dispositivos do Retrospect</a> para obter uma lista completa de unidades de fita e bibliotecas suportadas.
To install Retrospect, you need to install three separate software programs:
On the Retrospect server (i.e., the machine that will be performing the backups on your network, and that has backup storage devices attached), you must install the Retrospect engine.
On one or more machines that will be administering Retrospect, you must install the Retrospect console. A single console can control one or more Retrospect servers.
On each machine on the network you want to back up with Retrospect, you must install the Retrospect Client software. There are Retrospect Client installers for Mac OS X, Windows, Linux.
To install the Retrospect console:
Download Retrospect Backup for Mac from the website.
Unzip the file.
Double-click on "Install Retrospect".
Click "Install Retrospect" from the dialog.
Retrospect Backup Console will be installed in "Applications" and auto-launched, and Retrospect Backup Engine will be automatically installed and launched in the background as a service.
For macOS Mojave and macOS Catalina, please follow our step-by-step guide for enabling "Full Disk Access" below. See the step-by-step guide.
If you need Retrospect Backup Console without an engine installed, please visit our Downloads page.
Note: To install the Retrospect Client software using the public/private key authentication method, which provides additional security and allows the Retrospect server to automatically connect to clients with the matching public encryption key, refer to Chapter 4: Working with Clients, Servers, and Network Shares.
On each machine you want to backup over the network to a Retrospect server, insert the Retrospect CD or double-click the downloaded disk image to mount it on your desktop.
Double-click the Client Installers folder to open it, then double-click to open the Mac Client Installer folder. Finally, double-click Install OS X Client.
When prompted by the Installer, enter an administrator’s username and password, then click OK.
Follow the installer program’s instructions.
For macOS Mojave and macOS Catalina, please follow our step-by-step guide for enabling "Full Disk Access" below. See the step-by-step guide.
Note: To install the Retrospect Client software using the public/private key authentication method, which provides additional security and allows the Retrospect server to automatically connect to clients with the matching public encryption key, refer to Chapter 4: Working with Clients, Servers, and Network Shares.
1. On each machine you want to backup with Retrospect, copy the Windows Client Installer folder found inside the Client Installers folder on the Retrospect CD or downloaded disk image to the
Windows desktop.
2. Open the Windows Client Installer folder.
3. Double-click Retrospect Client for Windows [version number].exe, then follow the program’s instructions.
4. If requested, restart the Windows client machine.
Copy the appropriate file to a location on the network, then copy the file to the Linux computer on which you want to install the client software.
Enter the following commands.
$ tar -xf Linux_Client.tar $ ./Install.sh
Create and enter a password to prevent unauthorized access to the client; do not forget this password.
Note: Use only basic alphanumeric characters (low-bit ASCII) in passwords for clients. Macintosh high-bit characters do not correspond to Windows high-bit characters. For example, Luf$Luf00 is okay but Lüf•Lüføø will cause problems.
The client software runs automatically upon completion of installation.
Because Retrospect for Mac has a different underlying architecture and uses different configuration files than previous versions of Retrospect for Mac, version does not import settings from version 6.x or earlier installations. When upgrading, it is therefore necessary to rebuild the backup environment in Retrospect. The general steps to take are as follows, along with the chapters in which these steps are covered in this Users Guide.
1. Install Retrospect server and console (Chapter 1); configure
preferences (Chapter 7).
2. Create new Media Sets and assign media to contain the backup data (Chapter 5).
3. Create new Rules (which replace Selectors from previous versions) (Chapter 7).
4. Log in Retrospect client computers and network shares (Chapter 4).
5. Define Favorite Folders, which replace subvolumes from previous versions (Chapter 3).
6. Assign tags, which replace Source Groups from previous versions (Chapter 3).
7. Create scripts for backup, copy, grooming, etc. operations (Chapters 5 and 7).
O processo de instalação Retrospect para Mac não sobrescreve nem remove instalações existentes do Retrospect 6.1 (ou anterior). Recomenda-se que você continue a manter sua instalação existente do Retrospect até se sentir à vontade com Retrospect para Mac.
Para manter sua instalação existente do Retrospect 6.1 (ou anterior) e impedir que os scripts dessa versão sejam executados automaticamente, execute as seguintes etapas:
Para cada script de backup, duplicação e restauração com um agendamento, edite o agendamento do script e marque a caixa para “Ignorar execuções agendadas”. Digite uma data que será vários anos no futuro.
Para cada script do servidor de backup, edite seu agendamento e defina o agendamento para nunca ativo.
Caso você queira remover a instalação anterior do Retrospect, localize a imagem de disco que contém o instalador da sua instalação atual do Retrospect (ou baixe-a na seção Arquivos do site do Retrospect) e siga estas etapas:
Clique duas vezes no ícone Install Retrospect e forneça sua senha e concordância com a licença.
Escolha Desinstalar no menu pop-up Easy Install.
Clique no botão Desinstalar e siga as instruções na tela.
After you install the Retrospect engine on the Retrospect server machine, it automatically starts, and you should not normally need to interact with it other than by using the Retrospect console. However, if you want to manually shut down the engine, you may do so.
1. On the Retrospect server machine, open System Preferences.
2. In System Preferences, click the Retrospect icon.
3. Click the padlock icon in the lower left corner of the window. Enter an administrator’s name and password and click OK.
4. To shut down the engine, click Stop Retrospect Engine. After a moment, the engine stops, and the button changes to Start Retrospect Engine. Click the button again to restart the engine.
5. Normally, the Retrospect engine automatically starts upon system startup. If you do not want this to occur, uncheck “Launch Retrospect Engine on System Startup.”
To start the Retrospect console, double-click the Retrospect application icon inside the Applications folder on your machine. The Retrospect console will open and automatically look for a Retrospect engine running on the same computer. If one is present and running, the Retrospect console will connect automatically. If a local Retrospect engine is not present, you may add one or more remote Retrospect engines by clicking the plus (+) button in the bottom bar of the console.
Tip: In the Server Address of the resulting dialog, you may enter the IP address of the machine with the running Retrospect engine, or, if the machine is on your local subnet, you may enter its Computer Name, for example, Server.local. You can find a machine’s Computer Name in the Sharing category of its System Preferences.
The first time you connect to a local or remote Retrospect engine, Retrospect opens its Preferences window and asks you to enter your license code for that engine. Enter this information, then click Add.
At the registration screen prompt, click one of the following buttons:
Register, if you have not registered your copy of Retrospect and would like to do so. Clicking this button will launch your default Web browser and take you to the registration website, where you can fill out a registration form.
Already Registered, if you have already registered your copy of Retrospect.
Depending on the license code you entered, the Licenses pane of Retrospect Preferences will show the codes for the Application, Backup Clients, or Storage Devices.
Tip: While the Preferences window is still open, we suggest that you take a moment to click on the General pane, and enter a name for the Retrospect server in the Server name field. By default, Retrospect uses the server machine’s Computer Name as shown in System Preferences’ Sharing panel as the server name, which may not be as descriptive to you and your users as you would prefer.
You should also assign a password for each Retrospect engine you logged in by clicking the “Change server password” button and entering a password of your choice. This step prevents unauthorized access of the Retrospect engine from other Retrospect console applications running on your network.
When you’re done with the Preferences window, click its close box to dismiss it.
To exit Retrospect, choose Quit Retrospect from the Retrospect menu, or press Cmd-Q.
The Retrospect console is the user interface that controls actions that occur on the Retrospect server. The Retrospect console can be running on the Retrospect server machine, or it can operate the server from elsewhere on the network. Let’s take a detailed look at the console window.

The Retrospect console window is made up of several sections:
The toolbar across the top of the window contains buttons to launch the Backup, Copy, and Restore Assistants (these are the easiest way to create scripts and perform activities in Retrospect), the pause activity buttons, and the Search Field.
The sidebar on the left is where you choose which Retrospect server to control. If you have multiple Retrospect servers on your network, all of them will appear in the sidebar. Click on the disclosure triangle next to a server to show or hide its items, which allow you to control the functions of that server. Each server has the following items:
• Activities shows a list of the backup, copy, and restore events that Retrospect has performed, is performing, or is scheduled to perform (depending on your choice from the scope bar). Status icons in the left-most column show if the activity was successful or had problems. You can also tell the date and time of the activity; the name of the script associated with the activity; the type of operation; the activity’s sources and destinations; and (for current and past operations) the speed of the activity.
• Past Backups combine previous versions of Retrospect’s concepts of Snapshots (the listing of all files present on a source volume during a backup) and sessions (the actual files copied during a backup
operation). You can filter the list of past backups by Mac or Windows clients.
• Scripts control all actions in Retrospect, either with or without a schedule. The concept of immediate actions without creating a script (like an immediate backup) no longer exists. Any script can be run immediately by highlighting a script in the Scripts list and clicking the Run button in the list view toolbar.
You can explore and modify a selected script using the detail view below the Scripts list. By clicking on the tabs in the detail view, you can view a summary of the script; set the script’s source, destination, and rules; create or modify a schedule for the script to run; and set various script options.
• Sources displays a list of all local volumes and logged-in network shares for the Retrospect server, and added Retrospect client computers. You may add any client computers running the 6.1 (or later) Retrospect Client for Mac or the 7.6 (or later) Retrospect Client for Windows by clicking the Add button in the list view toolbar of the Sources list view. NAS devices and shares can be added similarly. The Sources list gives you information about each Source, including its name, the machine it resides on, the OS that machine is running, its capacity and how much of that capacity is used.
• Media Sets shows you a list of the Media Sets used for backups. Using the scope bar, you can filter the results of the list by the different Media Set types: All, Tape, Disk, and File.
• Storage Devices shows a list of the storage devices attached to the Retrospect server. This list does not display hard disks, removable disks, or NAS volumes (those are shown under Sources); rather, it includes hardware devices such as optical and tape drives and libraries.
Reports are the last item in the sidebar. Click the disclosure triangle to view the list of included reports. Custom reports can be saved from nearly any list view. Right-click any of the column headings in a list view to show or hide specific columns you want to appear in the report, click the column heading to set the sort order, click scope buttons to filter the results shown in the list, click the plus (+) button at the right of the scope bar to add further filter conditions, drag conditions if needed to change their order, then click Save Report in the scope bar. You’ll be asked to name the report. Any reports that you create will appear at the bottom of the Reports list.
The list view and an optional details view are in the main section of the window. The list and detail contents change depending on the item selected in the sidebar, and on choices made in the scope bar.
The list view toolbar beneath the main toolbar displays a variety of
context-sensitive buttons based on the selected item in the sidebar.
The scope bar has context-sensitive scope buttons, the Save Report button, and the (+) add condition button which appears above the list view when appropriate and allows you to filter the list view based on pre- and
user-defined conditions.
The bottom bar contains the (+) add button to add a Retrospect server to the sidebar, the gear icon Action menu button (which allows you to edit reports and pause operations) and the show/hide button for the details pane.
Primeiro lançamento — Quando o console do Retrospect for iniciado pela primeira vez, ele exibirá a exibição de inicialização. A partir daqui, você pode instalar um servidor local, adicionar um servidor remoto, visualizar este Guia do usuário, entrar em contato com o Suporte e visitar o site do Retrospect.
Servidor de Sincronização — Quando o console do Retrospect se conecta a um servidor, ele sincroniza as informações desse servidor. Para pequenas instalações, esse processo é rápido, mas para os maiores, isso pode demorar um pouco. O console é otimizado para permitir que você inicie enquanto o processo de sincronização está sendo executado em segundo plano.

Vários servidores — O Retrospect pode controlar vários servidores a partir da janela do console. Uma licença separada do Retrospect é necessária para cada servidor. Existe suporte total para Mac versão 9.0 e superior e suporte limitado para Mac versão 8.2.
Servidor de Licenciamento — Ao adicionar um servidor, o Retrospect solicitará que você insira seu código de licença. Digite o código da licença e clique em Adicionar.
Desbloqueando o servidor — Ao adicionar um servidor que tenha uma senha, o Retrospect exibirá um erro de senha e permitirá que você atualize a senha.
Atualizando o Servidor — Cada nova versão do console do Retrospect inclui um instalador de servidor atualizado. Quando o console é iniciado, ele irá notificá-lo se seus servidores podem ser atualizados. Se você optar por não instalar o servidor atualizado, poderá fazê-lo a qualquer momento.
Atualizando o Servidor — Para instalar o servidor atualizado posteriormente, clique no ícone de atualização. O Retrospect instalará automaticamente o novo software do servidor.
Exportando instaladores — O Retrospect inclui um instalador de servidor, instaladores de clientes para Mac, Windows e Linux e atualizadores de clientes (RCUs) para Mac, Windows e Linux. Para exportá-los para uma pasta local, abra <em >Preferências </em > na barra de menus em <em >Retrospect> Preferências ... </em > e clique em <em >Console </em > .

Retrospect Dashboard gives you a detailed monitoring view for your entire Retrospect Backup engine. Let’s walk through each section of the dashboard to discuss how you can use it to understand the current status of your business’s data protection strategy.

Running activities are displayed here.
You can see which sources are protected or not protected with ProactiveAI and their respective statuses. It should be all green, unless you have a subset of sources protected by scheduled scripts.
You can see all of the sources within the scope of your search and their statuses:
Green: This is a source with a successful backup.
Orange: This is a source with a failed backup.
Black: This is a source with a stopped backup.
Gray: This is an unprotected source.
This coloring gives you an at-a-glance check for how your backups are doing. If they are not all green, you should drill into which ones are not fully protected.
This is a list of the backups within the last 14 days and how much data they backed up.
This is a list of the most recently protected sources and the date they were last protected.
This is a list of sources that have had no backup in 7 days.
You can see how much data each backup set takes up and the total amount used.
This is a list of the backup sets and their usage.
Storage Predictions takes the current analytics for each set and predicts how much data will likely be used in the next week and the next month. You can use this to estimate when to add more storage or when Retrospect grooming will occur to free up space.
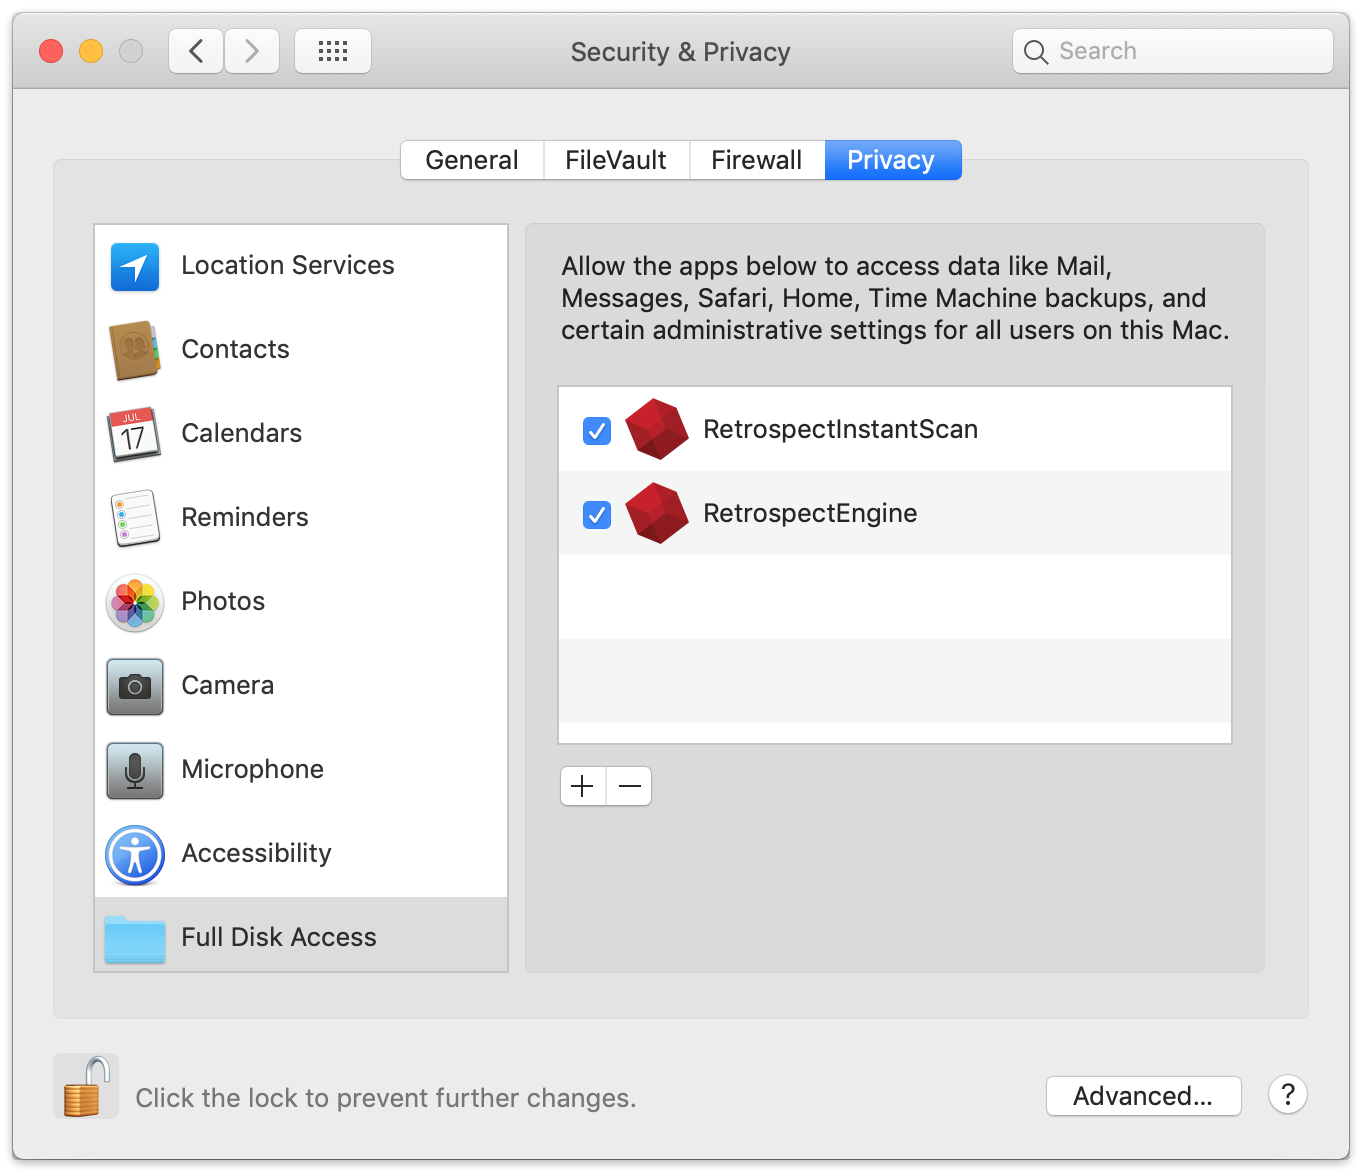
macOS Catalina (10.15) extends the Full Disk Access security feature from macOS Mojave (10.14) to help users manage their data privacy. This additional protection ensures you know exactly which applications have access to your data by requiring explicit consent for file-level access to certain application data folders, like Mail, Messages, and Safari, so Retrospect Backup engine and client will not be able to access the entire system without explicit user action. Follow our step-by-step guide to allow Retrospect Backup to continue protecting your Mac environment, under System Preferences > Security & Privacy > Privacy > Full Disk Access.
Open "System Preferences" under the Apple at the top left of your screen.
Click on "Security & Privacy" then "Privacy". You should see "Full Disk Access".
Click on the lock to authenticate and allow changes.
Now you need to find the Retrospect applications to drag into this list. Go to "Finder". Select "Go" from the menu bar and then "Go to Folder…". Enter:
/Library/Application Support/Retrospect
Scroll down "RetrospectEngine" and "RetrospectInstantScan" and drag them into the "Full Disk Access" list. Close "System Preferences".
Open "System Preferences" under the Apple at the top left of your screen.
Click on "Security & Privacy" then "Privacy". You should see "Full Disk Access".
Click on the lock to authenticate and allow changes.
Now you need to find the Retrospect applications to drag into this list. Go to "Finder". Select "Go" from the menu bar and then "Go to Folder…". Enter:
/Library/PreferencePanes (Retrospect Client)
/Library/Application Support/Retrospect (RetrospectInstantScan)
Scroll down "Retrospect Client" (from the first folder) and "RetrospectInstantScan" (from the second folder) and drag them into the "Full Disk Access" list. Close "System Preferences".

Retrospect Backup protects your data in-transit and at-rest with industry-standard encryption algorithms. Let’s walk through the different ways that your data is encrypted:
Retrospect Backup supports AES-256 encryption for all backup sets stored on any media, encoded on host, so your backups are encrypted before they touch the destination. That means cloud storage providers will never be able to access your data, but it also means no one can recover your data if you lose the encryption key.
Retrospect Backup supports a number of different network connections:
Clients: The agent-based connection is encrypted with AES-256 between the Retrospect Backup instance and the Retrospect Client agent for Windows, Mac, and Linux. For client-based history, on-demand backup, and on-demand and restore, the network connection is encrypted with AES-128.
Console: If you use the Retrospect Console for Mac on a different computer than the Retrospect Backup instance, the network connection is encrypted with AES-128.
Cloud Storage: The network connection is encrypted with HTTPS using TLS between the Retrospect Backup instance and the cloud storage provider. It supports up to TLS 1.2.
Retrospect Management Console: The network connection is encrypted with HTTPS using TLS between the Retrospect Backup instance and console.retrospect.com. It supports up to TLS 1.2.