This chapter describes how to use several aspects of Retrospect, such as its Preferences, in detail, and how to perform various tasks, such as managing media sets, viewing reports, and maintaining scripts. It also offers advice on using Retrospect to perform more effective backups.
You can adjust Retrospect preferences to modify the program’s behavior to best meet your needs. Retrospect preferences affect all operations performed by Retrospect.
Open the Preferences window by choosing Preferences from the Retrospect menu. The Preference window appears, with a toolbar that allows you to display each section of the application’s preferences. Click on the icon in the toolbar to display that section of Preferences. Retrospect remembers the last preference panel you previously worked with, so when the window appears, it is already set to that panel.

The Console preferences apply to the Retrospect console, and apply across all Retrospect engines you may have logged in.
Automatically check for Retrospect updates tells Retrospect to check for updates to the program when you launch the console.
Show up to n scheduled activities controls the number of upcoming activities that appears in the console, under the Activities category. In the pop-up menu, you can choose from 10, 20, 50, or 100 activities to be shown. This is needed as a script set to back up every day would have 365 scheduled activities just for one year.
Show up to n lines in the operations log allows the operations log to fill up to the specified number of lines. When the log reaches the limit set, the oldest entries are no longer shown, though they remain in the operations_log.utx file stored in /Library/Application Support/Retrospect/, up to the maximum log size specified in General Preferences (see “Log size limit” below). You can view the operations log by choosing View > Log, or by pressing Cmd-L. Type the length you want for the log in the entry field.
In General preferences, you set preferences for each logged-in Retrospect server. Each server you have logged in appears in the list on the left of the window. Click on the server you want to control in the list.

Server name can be anything you want; simply type in the field to change it. By default, Retrospect uses the server machine’s Computer Name as shown in System Preferences’ Sharing panel as the server name, but you may change it to be more descriptive to you and your users. The Server name is displayed to your users in the History section of the Retrospect Client among other places.
Server address is the IP address of the server computer. This field cannot be changed after the server has been logged in.
Change server password allows you to assign a password for access to the selected server. Clicking the button presents a dialog where you can enter the old password (if any), enter a new password, and then enter the new password again to confirm. Click the Change password button to accept the change.
Allow n Activity Threads provides a pop-up menu with numbers from 1 to 8. Setting the number of activity threads tells Retrospect how many simultaneous activities, such as multiple backup and restore operations, it can run at the same time. By default, a Retrospect engine is set for four concurrent activity threads. The number of activity threads that can be run at any one time efficiently is a function of the hardware capabilities of the Retrospect server machine as well as the type of task the thread will handle. Factors include the speed of the machine’s processor and the amount of its installed RAM but also the number of files being transferred. In general, you should have one Gigabyte of free RAM for each activity thread you will run.
Log size limit allows you to set a number, in megabytes, for the size of the Operations Log. The default setting is 10 MB. When the log reaches the limit, the oldest portion of the log is deleted to keep its size within the limit. The bigger the log is, the longer it will take to open. Type the maximum size of the Operations Log in the entry field.
Export the backup report allows you to save a copy of the backup report to a specific location on the server computer.
Public/Private Key Authentication is a method by which Retrospect Clients can be logged into a Retrospect server automatically through use of matching encryption key sets. In the Clients pane, you can create these AES-256 encrypted private and public key certificate files for your Retrospect Clients.
To set up this authentication, you will create two files, which are created on the Retrospect Server at /Library/Application Support/Retrospect/. The private and public key files are named privkey.dat, and pubkey.dat, respectively. The privkey.dat file remains on the Retrospect server, and the pubkey.dat file is copied to each of the Retrospect Clients.

To create the keypairs and install them with your Retrospect Clients, follow these steps:
In Preferences > Clients, click “Create keys…”, enter a password of eight characters or more for key creation, then click Create. Retrospect may take up to a minute or more to generate the keys, depending on the speed of the computer.
Upload it to Retrospect Management Console with the "Export public key to Management Console" checkbox.
If you want Retrospect to automatically log in clients with the proper public key, check “Automatically add clients”. This is recommended.
From the Retrospect disk image, open the Client Installers folder, then copy the Mac Client Installer folder onto your hard drive.
In the Finder, locate the pubkey.dat file in /Library/Application Support/Retrospect/ and copy it into the folder named “public_key” inside the Mac Client Installer folder on your hard drive.
Distribute or copy this public_key folder containing the pubkey.dat file along with the Retrospect Client installer.
After installing the Retrospect Client software on each computer, they can be logged in (or will be automatically logged in, if that option was set) at the Retrospect server.
If keypair files already exist on the Retrospect server, you may load them by clicking the Browse button, then navigating to the folder that contains the two keypair files, then clicking Select. This can be used to share the same keypair files between multiple Retrospect backup engines.
Media preferences controls how Retrospect works with media such as tapes, hard disks, and other media.
Automatically reuse named media tells Retrospect not to confirm with the user the erasure of media that has the same name that already contains data. For example, if you have one or more tapes that are part of a Media Set named Tape Backup A, and a script is set to automatically recycle the Media Set’s members at a regular interval, unchecking this box will cause Retrospect to require confirmation before erasing each member of the Media Set.
Minimal erase confirmation, when checked, skips the confirmation message that normally appears when you proceed with a backup operation and Retrospect needs to erase the media. By default, this preference is turned off.

For example, let’s say you do a normal backup to a tape member media set named “1-Media Set A”, but the only member loaded in your tape drive has a different name. Retrospect displays the media request window in which you can select the currently loaded tape. If the minimal erase option is checked and you select the tape and click Proceed, Retrospect will erase and use the tape. If the minimal erase option is unchecked, Retrospect displays a warning dialog asking if you really want to erase the tape.
Use new media automatically after write failure tells Retrospect to skip to blank media when it encounters a failure to write to the media, rather than reporting a failure and canceling the activity.
Retension tapes is used with older tape drives such as Travan, OnStream, and DC 6000 drives. It tells Retrospect to automatically wind the tape forward to the end and rewind after the script finishes to even out the tension and alignment.
Don’t eject removable disks. By default, Retrospect will automatically eject removable disks after a script finishes. Checking this prevents this from happening.
Media request timeout: n minutes sets the amount of time that Retrospect will wait for media to become available during execution. For example, if you’re using a tape autoloader, it may take several minutes for the device to find and load a particular tape in the Media Set. This preference is off by default, so media requests never time out.
Automatic skip to blank media uses a blank tape or disk when the last member of the Media Set is not available, even if that last member is not yet full.
Generate MD5 digests during backup operations is on by default. It tells Retrospect to create MD5 hash digests as part of backup operations. Retrospect later uses these digests to speed up media verification.
Out of the box, Retrospect is able to back up clients without any additional configuration. If your backup computer has multiple network interfaces or your clients are in different subnets, Network preferences allows you to manage how Retrospect accesses these backup clients. For example, a custom network interface lets you back up clients on different subnets without requiring backup data to cross routers, conserving network bandwidth.

You can name and assign different network interfaces to specific network addresses in Retrospect’s preferences, which will use the addresses in order. To do this, follow these steps:
Choose Retrospect > Preferences > Network. If more than one Retrospect server appears in the Server column, select the server you want to control. In the connection list on the right side of the window, your Mac’s default network connect will appear.
To add another network interface, click the Plus (+) button below the connection list. In the resulting dialog, choose from the Connection pop-up menu the IP address of the network interface you want to use, then enter a name for the connection and click Add
The new connection appears in the connection list. You can also restrict the subnets that Retrospect will use when it looks for clients and network shares. To do that, select one of the connections in the connection list, then click the Plus (+) button below the Details box. In the resulting dialog, enter the Subnet Address and Subnet Mask, then click Add. The subnet restriction will appear in the Details box.
Expert users may need additional control over Retrospect’s network behavior. Clicking the Advanced button in the Network preference pane brings up a dialog with the following settings:

Connection timeout The maximum amount of time Retrospect will wait for a client before logging an error and going to the next activity. Set this to a higher value if you receive -519 (network communication failed) errors and you know your network is slow.
Search poll interval When a client is unavailable at its last known address, Retrospect sends queries at this interval.
Search timeout Retrospect terminates its search for a known client when it cannot find the client in the specified time period.
Live poll interval Retrospect broadcasts to clients at this time interval when it polls for clients in the live network window. If you configured multiple subnets for the interface, Retrospect divides the poll interval by the number of defined subnets.
Forget counter Retrospect removes a client from the live network window when it does not respond to the specified number of sequential polls. This does not affect clients already added to the backup clients database.
Multicast time-to-live Retrospect assigns this “time to live” number to multicast UDP packets. It is the maximum number of router hops a packet can make before it is discarded. An increase in the time to live number lets Retrospect search for clients on more subnets connected by IGMP capable routers. Routers which do not support IGMP will not forward the multicast UDP packets.
Enter a value next to the settings you want to change, then click Done.
Warning: Make changes in this dialog only if you know exactly what you’re doing, or at the direction of Retrospect tech support. Under some circumstances, changes in this dialog can adversely affect Retrospect performance. Be careful! If you make a mistake, but are unsure what change caused problems, you can revert all of Retrospect’s preference settings for the selected server by clicking the Use Default button.
Retrospect has the ability to send e-mail notifications for both successful executions and problems. In the E-mail preferences pane, you can set the outgoing mail server that Retrospect should use, and the e-mail addresses that Retrospect will use to send the alerts. By default, Retrospect will not send e-mail alerts.

Outgoing mail server is an entry field where you can enter either a machine name (preferred) for the outgoing mail server or an IP address. You can also specify the TCP/IP port over which Retrospect should communicate with the mail server by appending its address with the port number, [serverIpAddress]:[portNumber], as in this example: smtp.servername.com:26.
My outgoing server (SMTP) requires authentication should be checked if the outgoing mail server requires a login.
User name: If the outgoing mail server needs a login, enter the user name assigned to Retrospect by your mail administrator.
Password: If the outgoing mail server needs a login, enter the password assigned to the associated user name.
Send e-mail for successful events should be checked if you want Retrospect to notify you every time it completes a successful execution. Be aware, however, that if you have many scripts running, you may receive a large number of e-mails.
Send e-mail for failure and media requests should be checked if you want Retrospect notify you when there are problems during execution. If you check this option, you will need to enter valid e-mail addresses in the From address and To address(es) entry fields. Note that you may specify multiple recipients in the To address(es) field. Separate each e-mail address with a comma.
Send Test E-Mail Click this button to send a test e-mail to the address or addresses in the To address(es) field.
The Rules preferences pane allows you to create and manage Rules, which are used to apply conditions to Scripts. See the “Working with Rules” section, on the next page, for more information.

In the Licenses preferences pane, you may enter the license codes you have purchased. Specific license codes unlock specific features of the product, such as Server Client licenses or the Open File Backup add-on for Windows clients. The first time you connect to a local or remote Retrospect engine, Retrospect opens this preferences pane and asks you to enter your license code for that engine. Enter this information, then click Add.
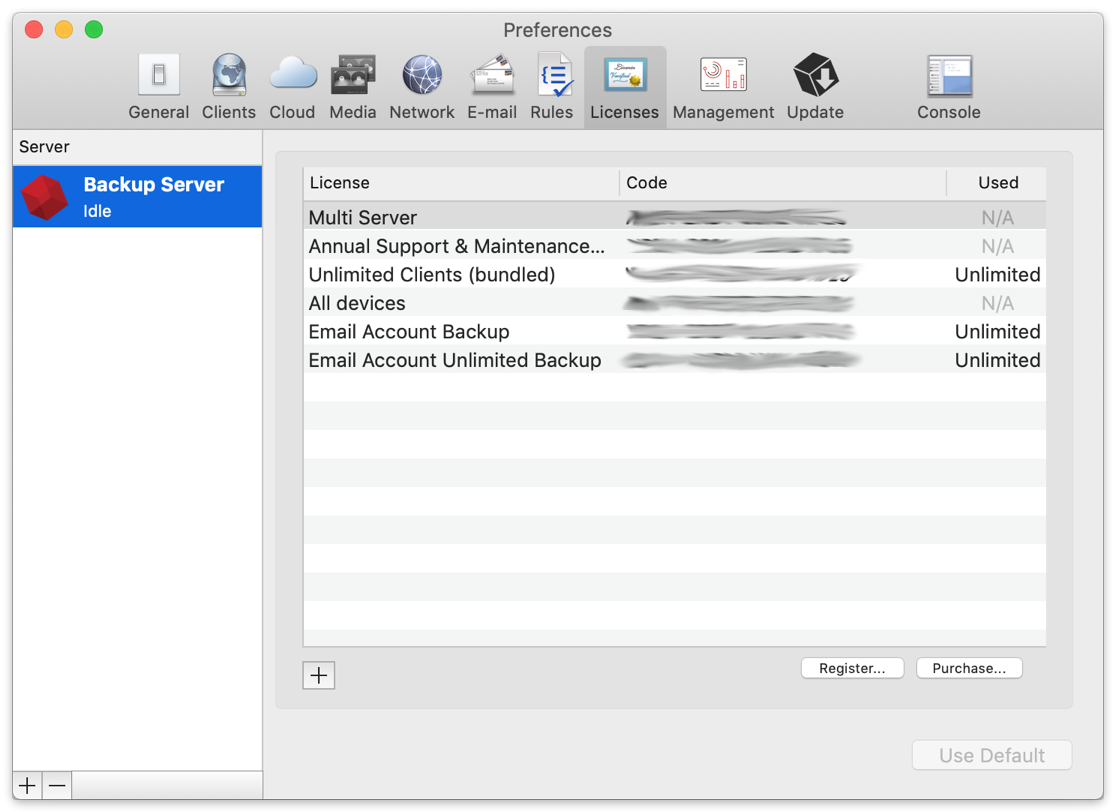
To enter additional license codes, click the plus (+) button near the bottom of the window. Enter the license code that you have purchased, then click the Add button. The new license code will appear in the window.
To register your Retrospect product online, click the Register button. You’ll be taken to a webpage that will walk you through the registration process.
To get information on how to purchase additional Retrospect license codes, click the Purchase button. A dialog will appear with the information.
You can use Rules with any operation to specify the types of files and folders you want the operation to include. Using Rules to intelligently select or ignore certain files and folders, you can limit the amount of time and media required for an operation.
Rules let you choose files based on almost any criteria, including name, date, type, or size. Retrospect includes a number of built-in Rules, and you can also create custom Rules. For example, you can create a rule that will choose all Microsoft Word documents modified after August 25, 2009.
A file that is “marked” by a rule (i.e., one that meets the rule’s criteria) will not necessarily be copied to the destination. All copying operations (such as backups) using rules are “smart,” because of Retrospect’s matching feature. For each rule, there is the implied meaning of “select this file, but do not copy it if it already exists in the destination.”
You create and modify Rules in the Rules Preferences pane. Choose Retrospect > Preferences, then click the Rules tab.
Retrospect comes with a number of Rules already set up for you. Rules are associated with each server separately, so if you have more than one Retrospect server, you can create different sets of Rules for each server. Simply click on the server in the sidebar of the preference pane to view the Rules for that server.
Tip: In previous versions of Retrospect, Rules were called Selectors, though the interface used to create them was quite different.
Retrospect includes several built-in Rules, with predefined conditions for selecting files.
Some rules and rule conditions function differently with Mac OS, Windows, and Linux volumes. Examine a rule’s details for more information.
Retrospect’s built-in Rules are:
All Files marks all files on the source, including the operating system files. This is the default rule.
All Files Except Cache Files marks all files on the source, except cache files used by certain applications, such as web browsers. These cache files, which are numerous and often large, are not typically useful for restoring.
Block Level Filter controls how a file is backed up, i.e. whether it is backed up in full or incrementally
No Files does not mark any files for backup, though Retrospect will still save a complete file and folder listing and associated metadata for each source. Use the No Files rule for testing purposes when you don’t want any files copied, or if you want to grab a System State-only backup of a Windows client.
Retrospect Files marks files having the file extensions and some specific filenames used by the Retrospect Backup family.
Users Files and Settings marks files and folders inside the Mac OS X Users, Windows Documents and Settings (in Windows XP, Server 2003), Windows Users (Windows Vista, 7, and Server 2008), and Linux /usr/ folders where users’ data and settings are stored.
You apply Rules during the creation of scripts. One of the steps in creating a script is working with the Rules tab. Click Scripts in the sidebar, select the script you wish to work on in the list, then click the Rules tab below. Select the radio button for the Rule you wish to apply to the script.

You may add a Rule, view a Rule, or modify a Rule in the Rules preferences pane. To add a rule, click the Add Rule button, which looks like a plus sign (+) below the list of Rules. To view or edit a rule, select a Rule in the list, then click the Edit Rule button, which looks like a pencil. The Rule dialog appears, showing its three parts:
The Rule name can be anything you like. It will appear in the Rules tab of Preferences and Scripts, and will appear in other places within Retrospect.
The include conditions section is where you tell Retrospect what files and folders you wish the Rule to encompass during the operation.
The exclude conditions section is where you tell Retrospect what files and folders to skip during execution.
Each rule must have a Rule name, and then you should add any include or exclude criteria you wish. The default Rule, All Files, has no specific include or exclude criteria, meaning that it includes any file and excludes none.
The scope menus allow you to define the extent of the conditions in either the include or exclude sections. The choices available from the scope menus are All, None, or Any. In the example in the screenshot above, the Any choice in the include conditions scope menu allows the rule to apply if any of the listed conditions are true, allowing the rule to encompass the user files and settings for Mac, Windows, or Linux clients. In this way, the Any choice acts as a logical or condition.

The All choice works as a logical and condition. For example, imagine that you want to backup all of the QuickTime movie files that are part of a particular project for your client Widgetco. You’ve previously saved all the movie files into a single folder. To add the All condition, hold down the Option key on the keyboard. The Add condition plus sign (+) on the “Any of the following are true” scope bar will change to an ellipsis (…), which you can then click to add the All condition. (The None condition is created in the same way, only you can change the All condition to the None condition.) You would then create two conditions:
Folder Name contains Widgetco
File Name ends with .mov
The include and exclude conditions sections allow you to add one or more conditions to the rule. You do that by clicking the Add condition button. Similarly, you can delete conditions by clicking the Remove condition button next to an existing condition, and you can also reorder conditions by dragging them on the screen (though it is not possible to drag conditions between the Include and Exclude criteria sections). Rules can have any number of conditions.
After you have added a condition, you need to build it using the pop-up menus and, optionally, the entry field in the condition.
![]() The pop-up menus and entry field are contextual, meaning that whether or not they appear and their contents change depending on the values of other elements within the condition. For example, the first and second pop-up menus interact in the fashion shown on the next page:
The pop-up menus and entry field are contextual, meaning that whether or not they appear and their contents change depending on the values of other elements within the condition. For example, the first and second pop-up menus interact in the fashion shown on the next page:
The third pop-up menu changes depending on the choices made in the first two menus. For conditions that will also require user input in the entry field, the choices in this third menu narrow the scope of the entry. For example, if you have chosen File in the first menu, and Name in the second menu, the third menu provides the choices contains, begins with, ends with, is, is not, and is like. The entry field will also be present in this example.
For example, you could use "Folder" "Mac Path" "is like" "/Volumes/*/Users/*/Library/*" to include all libraries for every user from every volume.
As another example, if you were to choose File in the first menu and one of the Date conditions in the second menu, the line changes to show two date-related menus, the first of which contains before, after, exactly, not, on or before, on or after, and within. The second date related menu contains today, backup date, and specific date (if you choose this, and entry field appears where you can enter the date).
As you can see, there are a large number of permutations available for each condition. Experiment with the menu choices to select the items that you want to include in the Rule.
First pop-up menu choice |
Second pop-up menu choices |
File |
Name |
Folder |
Mac Path |
Windows Path |
|
UNIX path |
|
Attributes |
|
Kind |
|
Date accessed |
|
Date created |
|
Date modified |
|
Date backed up |
|
Size used |
|
Size on disk is (folder only) |
|
Size on disk is not (folder only) |
|
Label |
|
Permissions |
|
Volume |
Name |
Drive letter |
|
Connection type |
|
File system |
|
Source Host |
Name |
Login name |
|
Saved rule |
Includes |
Excludes |
The “Saved rule” condition allows you to nest rules within rules. For example, to include the All Files Except Cache Files rule as a basis in your own custom rules, you would add the condition “Saved rule…includes…All Files Except Cache Files” in the Include criteria section beneath the “Any of the following are true” condition.
When you are done editing the Rule, click the Save button.
Exclude conditions always take precedence over Include conditions when Retrospect applies the Rule. For example, if a Rule has a statement which includes a user’s Documents folder and a statement which excludes the enclosing Users folder, the files in the Documents folder will not be selected.
Sometimes it’s easier to begin with and modify an existing Rule than to create a new one. To duplicate an existing Rule, select it in the list, then click the Duplicate Rule button below the list. Retrospect creates a new Rule named “old Rule name Copy.” To modify the duplicate Rule, click the Edit Rule button. Make sure to change its name, then continue on to modify the Rule’s criteria. When you are done making changes, click Save.
To delete a Rule, select the Rule in the list in Preferences, then click the Delete Rule button below the list, which looks like a minus sign (-). Retrospect asks you to confirm the deletion. Click the Remove button to eliminate the Rule.
This section suggests several strategies for backing up your computer or your entire network. Review each strategy and decide which will work best for your situation. Because everyone’s situation if different, you will probably want to modify a strategy to better fit your needs. You may even devise your own strategy which is quite different from these suggestions. These strategies are just suggestions to help you get started, and Retrospect’s features allow an unlimited number of different strategies. Just remember the basic backup rules when you go about creating a backup strategy of your own.
Retrospect is a powerful tool for safeguarding your data, but it’s most effective when you follow some basic backup rules:
Back up often because you can’t restore what isn’t backed up. For example, if your hard disk malfunctions today but you most recently backed it up a week ago, you will have lost the data you have accumulated over the week. Retrospect is most effective when you back up everything and back up often, which you can ensure by setting up scripts and schedules to automate backups.
Keep multiple backups of your data. Rotate among different Media Sets. Using more Media Sets makes you less likely to lose data if you misplace or damage media, especially if you are using tape or other removable media. Retrospect automatically keeps each Media Set complete and independent with its Smart Incremental backups, so there’s no need to worry about outdated full, incremental, or differential backup methods.
Make sure to verify your backups, either during backup using the Thorough or Media verification options, or after a backup has finished using a verification script or the Verify button under Media Sets.
Retire old media on a regular schedule. Regularly introduce new mediaxe “media rotation;rotating media” using New Media Set backups, because having all of your backups on one media set leaves you too vulnerable. (If even one tape of a set is damaged, you no longer have a complete backup.) A benefit of new media in your backup strategy is that it is faster to restore from a few media members than to restore from a set that has many members and backup sessions.
Use meaningful names for your Media Sets based on what they contain and how often they get rotated and then label your media appropriately.
Always store at least one Media Set off-site to guard against fire, theft, and natural disaster. Update this Media Set at regular intervals.
Take care of your backup media, which can easily be damaged by the environment. Tape media can also wear out after as few as several hundred uses.
Back up the backup computer. You probably have put more time and energy than you realize into your Retrospect configuration.
Back up or copy your Catalog files to their own Media Set or another destination on your network. See “Catalog and Configuration Backups,” later in this chapter.
When you need to back up a network of client computers, you must decide which kind of backup scripts to use. The table below lists situations which are suited to ProactiveAI Backup scripts or regular Backup scripts.
Situations Suiting ProactiveAI Backup |
Situations Suiting Backup Scripts |
You have a backup computer dedicated solely to that purpose. |
Your backup computer has other duties at other times. |
You have too many clients with too much data to be entirely backed up in a single night. |
Your scheduled backups are completed before the client computers are used in the mornings. |
You find yourself trying to catch up with your backups, making special scripts and running manual backups for certain clients that are not completely backed up by your regular backup script. |
Your scheduled backups are completed before the client computers are used in the mornings and unsuccessful backups are rare. |
You have mobile clients or portable drives that appear on the network at random times. |
Your network includes only desktop computers, no notebook computers or removable disks. |
You want Retrospect to back up to whatever media is in the backup device. |
The correct media is always available for unattended backups. |
Your backup strategy will most likely be a combination of regular Backup scripts and ProactiveAI Backup scripts. For example, you might choose to create ProactiveAI Backup scripts only for the notebook computers, and use regular Backup scripts for the servers and desktop computers on your network.
There are a very large number of possible backup strategies, and they are limited only by your imagination and hardware. Here are some example strategies to get you started.
Create a Backup script to two rotating Media Sets. In the script’s Schedule tab, add a schedule that repeats every other week at the same time, and select Monday through Thursday. Set this schedule to use the “No media action” media action to the first Media Set, so it does a regular backup. Add a second schedule that repeats once every other week (say on Friday) or monthly (say on the first of each month), and use the Recycle Media Set media action for the first Media Set. The second schedule will reset the Media Set and begin a fresh backup when it executes, keeping the overall size of the Media Set down. Then create two more schedules exactly like those above, only schedule them to run alternating weeks to the second Media Set. This strategy ensures that there is some amount of historical data (at least a week’s worth) on one Media Set when the other is recycled and overwritten.
This strategy uses multiple Media Sets, one destination per workday. The idea is that you always have separate five-day rolling backups of your sources. The backup will run five days per week. Follow these steps:
Begin in the Media Sets category of the console by creating five destination Media Sets, named Monday, Tuesday, Wednesday, Thursday, and Friday. They can be any kind of Media Set, though the Disk kind will be most convenient.
In the Scripts category, create a new Backup script.
In the new script’s Sources tab, choose the sources you wish to back up. You can choose from any of Retrospect’s Source types: local volumes, Retrospect clients, network volumes, Tags, or Smart Tags.
In the script’s Media Sets tab, click the checkboxes next to all five of the destination Media Sets that you created.
In the script’s Rules tab, choose the Rule that you want to apply to the backups.
In the script’s Schedule tab, create a schedule. Choose the Monday Media Set as the destination, and choose “No media action,” which will back up all files and folders that have not been previously backed up to this Media Set. Choose a start time, and repeat the script every one week, selecting only the Monday button. Now Retrospect will do a backup every Monday to the Monday Media Set.
Repeat the previous step four more times, substituting a new day’s Media Set as the destination and selecting the matching day in the Schedule tab. When you’re done, you’ll have five schedules for the script, each of which will execute once per week.
Create a ProactiveAI Backup script backing up all client sources. Schedule it to work from 7:00 P.M. to 7:00 A.M. during the work week (so as not to interfere with the users during their workdays) and all the time during weekends. Set the backup interval so Retrospect backs up once per day.
Under the Tags tab of Sources, add a Tag called Mobile Computers. In the Sources list, select each of your Sources that are mobile devices, and apply the Mobile Computers tag. Remember that you can apply the tag to entire hard disks or to Favorite Folders, controlling the amount of data you will be backing up.
Next, create a ProactiveAI Backup script. In the Sources tab of the script, select the Mobile Computers tag. When the script executes, Retrospect will back up all of the tagged Sources, saving you a lot of setup time because you don’t have to select each mobile device separately. Schedule the new script to run twenty-four hours per day, with a backup interval of eighteen hours. (You never know when you’re going to see a laptop again, and they’re prone to breakage and theft, so it’s rarely a bad idea to back them up more often.) Activate the “Allow early backup” option, so users who might be about to leave for a business trip can request an early backup.
A staged backup is one in which you perform one or more backups to one kind of Media Set, and then copy those backups to a different Media Set, usually for archival purposes. The destination Media Set can be the same kind, or a different kind. For example, you could do a series of regular backups to a Disk Media Set, and then once per week (or once per month, or any other arbitrary time period you set) copy the contents of the Disk Media Set to a Tape Media Set. You can then file the tapes in your archival vault or other off-site facility.
Disks are great at absorbing data transfers that arrive in bursts from network computers, resulting in faster backups than if you backed up directly to tape. Once data is backed up to disk, it can be easily transferred to tapes. The transfer from disk to tape is efficient because data from the disk arrives at a constant rate (no network bottlenecks), keeping your tape drive streaming forward at maximum speed. Tapes can then be stored offsite for safety, while disk backups stored onsite can be used to perform restores quickly.
To create a staged backup with the above scenario, you need to create two scripts: your regular Backup script to a Disk Media Set, and a Copy Backup script to a Tape Media Set.
Begin by preparing the two Media Sets. Use a Disk Media Set with grooming enabled as the destination for the Backup script. Set the grooming option so that Retrospect keeps at least the last 10 backups for each source. This ensures that you will have a history of client data on disk for quick restores.
Create the Backup script. You may, of course, use an existing script. Set up a daily schedule for the backup.
Create a Copy Backup script to transfer the disk Media Set data to a tape Media Set once a week. In the Sources tab of the Copy Backup script, choose “Copy most recent backups for each source.” In the Destinations tab, select the tape Media Set. Set the Rule that you want to apply to the script (for example, you might not care if your off-site archive set contains backed up operating systems and applications, so you would select the rule “User Files and Settings”), then add a weekly schedule. Every time the Copy Backup script runs, it will copy only new and changed files from the most recent backups contained in your Disk Media Set to the Tape Media Set. After the data in the disk Media Set has been copied to the Tape Media Set, you may take the tapes off-site for safe keeping, but don’t forget to bring them onsite occasionally for an update!
Catalog files are the indexes to Media Sets, and they must be present for any operation involving a Media Set. By default, Catalog files are stored on the Retrospect backup server’s hard disk. Since they reside on a hard disk, they face the same risks as your other files. If the Retrospect server’s hard disk fails, and you lose your Catalog files, Retrospect cannot restore any files until the catalogs are recreated, which can be a lengthy process. It is always faster to restore an older version of a Catalog file and update it from the Media Set then it is to completely recreate a Catalog from the media. For this reason, you should back up your Catalog Files as well as your regular files.
The default location where Catalog Files are saved on the Retrospect server is /Library/Application Support/Retrospect/Catalogs/.
Similarly, Retrospect’s configuration file contains your client database, scripts, schedules, preferences, custom rules, and other important information. Retrospect uses the configuration file, named Config80.dat, located at:
/Library/Application Support/Retrospect/.
Periodically, Retrospect automatically saves a backup copy of Config80.dat in a file named configs.xml. You should back up both of these files regularly. If your active configuration file (Config80.dat) becomes corrupt, stop the Retrospect engine, delete the Config80.dat file, then start the Retrospect engine, which creates a new Config80.dat from configs.xml.
It’s important to backup the Catalogs and configuration files regularly. Follow these steps:
In the sidebar, click Sources.
In the Sources list, click to select the hard disk of the Retrospect backup server.
Click the Browse button. Retrospect will display a browse dialog showing the contents of the Retrospect backup server’s hard disk.
Navigate to, then click to select /Library/Application Support/Retrospect/.
At the bottom of the browse dialog, click Add to Favorite Folders, then click Done.
In the sidebar, click Media Sets, then above the Media Sets list, click the Add button. Retrospect displays the Media Set dialog.
Choose the Media Set type, add a name for the Media Set, set any security you want for the Media Set, then click the Add button.
In the sidebar, click Scripts, then above the Scripts list, click the Add button. Retrospect displays the Script dialog.
Enter a script name (Catalog Backup is a good candidate), select All in the category list, then click Backup in the list of script types. Click the Add button. Retrospect returns you to the Scripts list.
In the detail area, click the Sources tab, then click the checkbox next to the Retrospect Favorite Folder you just created.
Click the Media Sets tab, then click the checkbox next to the name of the Media Set you created.
In almost all cases the default Rule of All Files will be what you want, so skip the Rules tab and click the Schedule tab. Add one or more Schedules to backup the Catalog and configuration files. As one possibility, you could create one schedule that executes every day at a particular time with no media action (which does a regular backup), and add a second schedule with a Recycle Media Set media action (which erases any previous backups and creates a new, fresh backup) once a month.
Retrospect’s reporting abilities let you monitor backup execution history and error messages by viewing logs and reports. You may need to examine these to find out why an operation was unsuccessful in order to diagnose problems.
Retrospect has a number of built-in reports, and you may also create your own. To see the reports, click the disclosure triangle next to Reports in the sidebar.
To view a report, click on one of the report names in the sidebar. The main part of the Retrospect window changes to display the report.

You can customize any report view. You may sort most columns in ascending or descending order by clicking the column header; a selected column is highlighted, and there is a upwards or downwards pointing sort arrow in the column heading. You may change the order of the columns in the list by dragging column headers. Clicking the line between the two columns allows you to drag to change the width of the column.
Different kinds of reports have different default columns. Besides these default columns, by right-clicking in any of the column headers, you get a contextual menu from which you may add additional choices to the list, or remove existing columns.

In Retrospect’s sidebar, the Activities, Past Backups, Scripts, Sources, and Media Sets categories allow you to create custom reports. To begin, click to select one of the categories. As an example, we’ll create a new report that alerts us when there are more than 10 errors in an operation.
Click on the Activities category, then click the plus (+) button in the scope bar to add the report and show the report criteria bar. Each category provides appropriate report criteria.
From the report criteria bar, choose the criteria you want, and if necessary, enter text or a number to narrow the scope of the criterion. You may add additional criteria by clicking the plus () button on the bottommost criterion. Holding down the Option key changes the plus () buttons to an ellipsis (…), which can be Option-clicked to add Any, All, and None conditions to the report criteria.

When you are done setting report criteria, click Save Report. In the dialog that appears, enter a name for the report, then click OK. The new report appears under the Reports category in the sidebar.
To edit a report, click on the report’s name in the sidebar, then at the top of the report, click the Edit Report button. The report criteria bar appears, with the existing criteria. Change any criteria you wish, then click Save Report. You can also edit a report by right-clicking on the report’s name in the sidebar, and choosing Edit Report from the resulting contextual menu. The same menu also appears at the bottom of the sidebar as a tools menu with the gears icon.
To duplicate a report, perhaps because you wish to use it as the base for a new report, right-click on the report’s name in the sidebar, and choose Duplicate Report from the resulting contextual menu. Retrospect displays a dialog asking you to name the new report. Enter the name, then click OK. Then edit the duplicated report as needed.
To delete a report, select the report in the sidebar, then right-click and choose Remove from the contextual menu or choose Remove from the tools menu at the bottom of the Retrospect window.
The operations log shows a record of each Retrospect operation, transaction, and event, including any errors that occurred. The log stores messages that are generated during an operation. You may need to examine the log to find out why an operation was unsuccessful in order to diagnose problems.
To view the log, choose View > Log, or press Cmd-L.

The log shows the following information for each successful operation.
Completed indicates the number and size of the files that were copied. If you used Retrospect’s data compression feature, the log also shows compression achieved for this session.
Performance indicates the number of megabytes of information copied per minute. If the Verification option is turned on, additional performance figures are listed for comparing.
Duration shows the total time required to complete the operation. If you clicked Pause during the operation or there were delays while you inserted media, the waiting time is shown separately. The waiting figure includes time spent during tape drive locate functions and other required functions.
To find items in the log, when the log window is open, choose Edit > Find, or press Cmd-F. A search field appears at the top of the log window, with forward and back buttons next to it. Enter the text that you wish to search for in the search field. As you type, Retrospect shows you how many matches there are in the log for the search term.
Note: You can choose how many lines you wish to appear in the operations log in the Console tab of Retrospect’s Preferences.
To print the Log, view it then choose Print from the File menu.
Retrospect provides a number of tools to help you effectively manage your Media Sets. Choose Media Sets from the sidebar to view a list of the Media Sets and display the Media Set toolbar.

To create a new Media Set, click Create New. The process of creating a new Media Set is described in “Add Media Sets” in Chapter 5.
You can remove a Media Set from the Media Set list by selecting it and clicking the Remove button. Click OK when prompted to remove the Media Set. Removing a Media Set does not affect the contents of the Media Set, nor does it delete its Catalog file. However, it does remove the Media Set from any scripts that use it.
As long as you don’t delete the Catalog file and erase the media on which the Media Set is stored, you can always add the Media Set back to the list later. This process is described in “Rebuilding a Media Set,” later in this chapter.
All Media Sets have a Catalog file, which serves as an index to the Media Set and allows Retrospect to find and restore data without needing to search through the entire Media Set. Retrospect keep its Catalog files on the Retrospect server machine, at /Library/Application Support/Retrospect/Catalogs/.
If you move a Media Set from one Retrospect server to another, you must add the Media Set’s Catalog file so you can work with the Media Set. To do that, copy the Catalog file onto the Retrospect server, preferably into the default location (which will require admin-level authentication), so all of your Catalog files are in one place. Next, in the Retrospect console, click the Locate button in the Media Set toolbar. In the resulting dialog, navigate to the location of the Catalog you want to add, then click OK. Retrospect will ask you to enter the Media Set’s password, if any. Enter it, then click OK to exit the password and navigation dialogs. Retrospect reads and stores the location of the Catalog file.
Note: If you’re moving a Retrospect server to a new machine, there are a few other things you must do. See “Moving Retrospect,” later in this chapter.
You can optionally perform a Verify operation with the Media Set to make sure that Retrospect knows how to access the actual media in the Media Set. See “Verifying a Media Set,” later in this chapter.
Copy Media Set scripts allow you to make a copy of an entire Media Set onto different media. In the Media Set toolbar, there’s an easy way to begin a Copy Media Set script. Select a Media Set from the list, then click the Copy button in the Media Set toolbar. Retrospect displays a dialog asking you to enter a name for the new Copy Media Set script, with a default name of “Copy Media Set — Media Set name” already entered. Accept the default name or enter your preferred script name, then click Create.
Click on Scripts in the sidebar, and you will see in the Scripts list the new Copy Media Set script, with the Source of the script already selected. Finish setting up the script by adding the script’s destination, rules, schedule, and options. For more information, see “Creating a Copy Media Set Script” in Chapter 5.
If you want to manually verify your Media Set, select the Media Set in the list and click the Verify button in the Media Set toolbar. Retrospect begins a Verify activity, which you can monitor by clicking the Activities category in the sidebar. During this activity, Retrospect scans the Media Set, verifying that it is readable and matches the Catalog file. The Verify feature is useful for performing offline verification of your Media Set media after an backup or archive that did not use verification.
Tip: You should use Verify scripts to schedule offline verification if you want to maximize your backup window by running scripted backups (or archives) without verification.
Whenever possible, a Verify activity verifies data on Media Set media by comparing the files in the selected Media Set to MD5 digests generated during the backup. This means that Retrospect does not need to access the backed up source volumes, which prevents slowdowns on those volumes and speeds the overall operation.
In certain circumstances, Retrospect does not have access to MD5 digests generated during backup. This is true for all backups created when Retrospect’s “Generate MD5 digests during backup operations” preference was disabled. In these cases, Retrospect still checks all files on the Media Set media to make sure that they are readable, though in this case their integrity cannot be guaranteed.
Note: A Verify activity does require you to reinsert media when verifying backups that span media.
To verify media integrity, follow these steps:
Select the Media Set you wish to verify, then click the Verify button in the Media Set toolbar.
When Retrospect finishes, click the Past button in the scope bar of the Activity list for details on whether the verification was successful. If the operation was not successful or reported errors, click the Log tab for additional information.
Occasionally, a Catalog file can become out of sync with the contents of its Media Set, such as when a power outage occurs in the middle of a backup operation. In this event, Retrospect will report a “Catalog out of sync” error. This is similar to losing your Catalog to a disk failure when you have a day-old copy of the Catalog file on another disk. In that case, you can copy the backup Catalog to the Retrospect server, then run the Repair feature to bring the backup Catalog back into sync with the media. Repairing the Catalog scans the Media Set and updates the Catalog file so that it matches the media.
You must update the Catalog to synchronize it with the media or you will be unable to use the Media Set. A “Catalog out of sync” error indicates Retrospect was unable to update the Catalog the last time it copied data to this Media Set—-possibly because of a crash or power failure. This error may also be caused by a full disk or by a lack of memory.
To repair a Media Set, follow these steps:
Select the Media Set you want to repair in the Media Set list.
Click the Repair button in the Media Set toolbar. Retrospect displays the Repair dialog, asking you to select the first member of the Media Set.
Click the Add Member button. Retrospect displays a dialog that allows you to navigate to the first member of the Media Set. In this example, using a Disk Media Set, we navigated into the Retrospect folder on our backup disk, then into the folder that contains the Media Set we wish to repair, and then we finally select the first member of the Media Set. It will always be named “1-Media Set name.”
Click Next. Retrospect looks at the selected Media Set member, and displays a dialog showing the date, name, and status (encrypted or not encrypted) of the Media Set member.
Click to select the Media Set member in the dialog, then click Next. The Media Set member appears in the Repair dialog.
If there are additional members of the Media Set you need to add, repeat steps 3 through 5 until all members have been added.
Click Repair. Retrospect begins a Recatalog operation. You can monitor its progress in the Activities list. When Retrospect finishes, click the Past button in the scope bar of the Activity list for details on whether the recatalog was successful. If the operation was not successful, click the Log tab for additional information.
Rebuilding a Catalog recreates a fresh copy of the Catalog. A rebuild might be performed for a number of reasons, such as loss of the original due to disk failure. It scans the backup media and recreates the Catalog in its entirety.
Note: Retrospect has a feature, found in the Options tab of a Media Set, called Fast Catalog Rebuild where, every time it starts a tape after the first in a Media Set, it writes the current Catalog to the beginning of that tape. This speeds rebuilding of the Catalog by only requiring the last piece of media belonging to the Tape Media Set to be scanned by Retrospect. The Fast Catalog Rebuild option can also be used on Disk Media Sets that don’t have grooming turned on.
To rebuild a Media Set, follow these steps:
Select the Media Set you want to rebuild in the Media Set list.
Click the Rebuild button in the Media Set toolbar. Retrospect displays a dialog asking you what type of Media Set you would like to rebuild. Make your choice, then click Next.
Retrospect displays the Rebuild dialog, asking you to select the first member of the Media Set. The Rebuild dialog may be slightly different, depending on the type of Media Set you previously chose.
Click the Add Member button. Retrospect displays a dialog that allows you to navigate to the first member of the Media Set. In this example, using a Disk Media Set, we navigated into the Retrospect folder on our backup disk, then into the folder that contains the Media Set we wish to rebuild, and then we finally select the first member of the Media Set. It will always be named “1-Media Set name.”
Click Next. Retrospect looks at the selected Media Set member, and displays a dialog showing the date, name, and status (encrypted or not encrypted) of the Media Set member.
Click to select the Media Set member in the dialog, then click Next. The Media Set member appears in the Rebuild dialog.
If there are additional members of the Media Set you need to add, repeat steps 4 through 6 until all members have been added.
Click Rebuild. Retrospect displays a dialog asking you to specify the folder where you want the rebuilt Catalog to be placed. Navigate to your desired location, select the folder, then click Rebuild. Retrospect begins a Recatalog operation, building a new Catalog file from the contents of the Media Set. You can monitor its progress in the Activities list. When Retrospect finishes, click the Past button in the scope bar of the Activity list for details on whether the rebuild was successful. If the operation was not successful, click the Log tab for additional information.
By default, when a disk that is a member of a disk Media Set becomes full (or uses all the disk space you allotted), Retrospect asks for a new disk so it can continue to copy files and folders.
If you would rather continue to use the existing disk, you can use Retrospect’s grooming options to reclaim disk space by deleting older files and folders to make room for new ones.
Once disk grooming is enabled and you specify a grooming policy (or use Retrospect’s policy), Retrospect automatically deletes older files and folders (based on the policy) when it needs more space.
Warning: As mentioned, grooming deletes files and folders to save disk space. These files and folders cannot be recovered. Before enabling grooming, make sure you have a backup policy that protects your critical files and folders.
These options are only available for Disk Media Sets. The selection you make tells Retrospect what to do when the Media Set to which you are backing up becomes full (or uses all the allotted disk space has been used). You can choose the disk grooming options in the Options tab of Media Sets.

The grooming options are:
No grooming: When the backup drive fills up, Retrospect asks for another hard drive on which to store additional backups. All of your backups on the original hard drive are preserved.
Groom to keep this number of backups: Specify the number of backups you want to preserve for each source when the backup drive fills up, or when you run a scripted or manual groom operation. Retrospect then automatically “grooms” (i.e., deletes) all the other, older backups on the hard drive to make room for new data.
Groom to Retrospect defined policy: When the backup drive fills up, or when you run a scripted or manual groom operation, Retrospect uses its own grooming policy to delete old backups. At a minimum, Retrospect’s policy retains two backups for each source, saving the last backup of the day for each source from the two most recent days on which each source was backed up. Given enough space in the Media Set, Retrospect keeps a backup of each source for every day in the last week, a backup for each week in the last month, and a backup for each previous month.
Normally, you set a grooming option and need to do no more. But since you can turn grooming on or off for a given Disk Media Set at any time, you may have a nearly-full Media Set that you want to groom immediately after you enable grooming for the set.
Note: When you activate grooming for a Media Set, Retrospect will retrieve the point-in-time file and folder listings from the Media Set for each source, going back as far as the number of backups you’ve set to keep in the grooming options, and add them to the Media Set’s Catalog. Because Catalogs for Media Sets with active grooming policies need to store this additional data, they will be larger in size than Catalogs belonging to .
To groom a Disk Media Set manually, select the Media Set in the list, and click Groom in the Media Set toolbar. Retrospect displays a dialog asking you to confirm the groom operation. Click Groom. Retrospect begins a Grooming operation, removing excess backups from the Media Set, according to the grooming options. You can monitor its progress in the Activities list. When Retrospect finishes, click the Past button in the scope bar of the Activity list for details on whether the grooming was successful. If the operation was not successful, click the Log tab for additional information.
When you perform a Recycle, Retrospect clears the Catalog file contents (if any) of the Media Set so it appears that no files are backed up. Then it looks for the first media member of the Media Set and erases it if it is available. If the first member is not available, Retrospect uses any available new or erased media of the proper format. Everything selected from the source is backed up to the Media Set.
You can set a Media Set to be recycled with a script schedule, or manually in the Media Sets list. To Recycle a Media Set, follow these steps:
Select the Media Set you want to recycle in the Media Set list.
Click the Recycle button in the Media Set toolbar. Retrospect displays a dialog asking you to confirm the choice. Click Recycle.
Because the recycle will result in data loss, Retrospect asks you to confirm the operation again. Click Cancel or Recycle.
If you clicked Recycle, Retrospect deletes the contents of the Catalog file.
If you ever decide to switch backup computers, you must do more than just install Retrospect and your backup device on the new machine. You must move some other files to the new backup computer in order to keep Retrospect’s preferences, clients, catalogs, scripts, and schedules intact.
To move Retrospect to a new backup computer, follow these steps:
Install the Retrospect engine and console on the new computer.
Gather the following files and folder from the /Library/Application Support/Retrospect/ folder on the old Retrospect server and copy them to the Desktop on the new Retrospect server:
On the new Retrospect server, use the Retrospect system preference pane to stop the Retrospect engine.
Copy the files and folder gathered in Step 2 to the /Library/Application Support/Retrospect/ folder on the new Retrospect server, replacing the existing files. You may need to authenticate with an administrator password to complete this operation.
Correct the ownership of the files you just moved by opening the Terminal application and carefully entering the following commands and authenticating with an administrator password:
Use the Retrospect system preference pane to start the Retrospect engine on the new Retrospect server.
Next, you must force the new Retrospect server to recognize the Catalog files you just moved. In the Retrospect console’s Media Sets category, highlight all the Media Sets with red X icons in the Status column and click the Remove button. Then click the Locate button and follow the steps described in “Adding a Media Set’s Catalog,” earlier in this chapter for each Catalog file that you copied to the new Retrospect server.
If you want to back up the old computer and/or the new backup computer, you must perform a few extra steps:
If the new backup computer was previously backed up as a client, that is no longer necessary since its volumes are now local. Remove the client. Edit the sources in any Retrospect scripts which used client volumes from the new computer and add the volumes which are now local.
If you still want to back up the old backup computer you must install Retrospect Client software on that machine to access its volumes with Retrospect from the new backup computer. After installing and configuring the client, add its volumes to your scripts. In Sources, remove the previously local volumes. Removing volumes removes them from the volumes database and any scripts which use them.
Para remover Retrospect para Mac, siga as etapas descritas abaixo.
O Uninstaller preserva os arquivos Config (que contêm o banco de dados de clientes, scripts e agendamentos conectados, e as preferências gerais do mecanismo Retrospect), as preferências do console do Retrospect e todos os arquivos do Media Set Catalog (que controlam quais arquivos são copiados para cada Conjunto de mídias). Se, em vez disso, você quiser <i >remover completamente todas essas configurações e Catálogos </i > , exclua os seguintes arquivos e pastas:
/Library/Application Support/Retrospect/Catalogs/
/Library/Application Support/Retrospect/Config80.bak
/Library/Application Support/Retrospect/Config80.dat
/Library/Application Support/Retrospect/ConfigISA.bak
/Library/Application Support/Retrospect/ConfigISA.dat
/Library/Application Support/Retrospect/retro_isa.ini
/Library/Application Support/Retrospect/retro.ini
~/Library/Preferences/com.Retrospect.plist
Abra a pasta do aplicativo Retrospect e clique duas vezes no ícone Desinstalar Retrospect para executar o desinstalador.

