

sudo docker run -p 5001:5001 --name acme -d minio/minio server --address :5001 --config-dir /docker/minio/tenantconfig/acme /export/acme
Cloud Backup
title: Cloud Backup - How to Set Up Minio for Multi-Tenant Cloud Hosting created_at: 2018.08.09 updated_at: 2018.08.09 category: Cloud Backup --- :toc: macro :toc-title:

Minio Private Cloud Storage provides a free, open source, scalable cloud storage location for secure on-site data protection. Retrospect 15.1 for Windows and Mac are certified for Minio. Follow these step-by-step instructions for configuring Retrospect to integrate with Minio.
We will walk through setting up Minio for multi-tenant cloud backup hosting: using Minio to host multiple accounts for different customers.
Choose a NAS with Docker capabilities, as Minio requires Docker. We will use a Synology NAS in this guide.
Choose where on the NAS to put the tenant backups. We created volume4/tenant backup/.
Choose where on the NAS to put tenant configuration files. We created volume1/docker/minio/tenant config/.
Note that both places should not be within the Minio Docker instance as the data is not persistent.
Create a list of customers that will be housed in the NAS with unique text names and port for each one (i.e. Acme Holdings: 'acme' / port 5001).
Add a port forwarding rule in your firewall for those ports to go to your NAS.
Install Docker

Open Docker
Click on 'Registry' on the left hand pane
Search for 'minio'
Click to highlight minio/minio, and then click 'Download' at the top
Choose the 'latest' build

Click on 'Image' on the left hand pane, and you will see the minio/minio:latest image

Download and install PuTTY or your choice of client.
Enable SSH on the Synology (and remember to disable it again afterwards) by going to 'Control Panel - Applications - Terminal & SNMP'
Select the checkbox to 'Enable SSH server'

Open PuTTY

Enter the IP address of your Synology NAS, and click 'Open'
You will at this stage be prompted to 'login as:', so enter your username and password for your Synology NAS

To fire up your first docker minio instance, paste this command into PuTTY using copy and then the right click of your mouse, replacing "acme" with your first client’s short text name and their port number instead of "5001".
sudo docker run -p 5001:5001 --name acme -d minio/minio server --address :5001 --config-dir /docker/minio/tenantconfig/acme /export/acme
Repeat this process for each of your tenants. Each of these will be a Docker instance.
If you now look back at Docker on your Synology NAS, and click on 'Container' on the left hand pane, you will see a list of running instances.

You can verify the Minio instance is running by accessing the NAS at that port. You will see a login screen.
You can retrieve the Minio Access Key and Secret Key for each instance from the Docker GUI on Synology.
Click and highlight the container, and the click 'Details' at the top
Click 'Log' from the menu at the top, and scroll until you reveal the key’s.

Copy them, and keep them secure. You will need them to access the cloud storage from Retrospect backup server, or to login to the web client.
After you’ve entered them in, you’ll access the storage, and it’s empty and not persistent. We need to configure the persistent storage.
Click the on/off button to switch the container off. Or click 'Action-Stop'
Click the container to highlight, and click Edit
Click the Volume menu at the top, and then Add Folder
Create and select the folder that you have chosen to store the backup data for this tenant to. In our case, we used volume4/tenant backup/acme then in the 'Mount path' field, we typed /export/acme.

Click 'Add Folder' again
Create and select the folder that you have chosen to store the config data for this tenant to. In our case, we used volume1/docker/minio/tenant config/acme then in the 'Mount path' field, we typed '/docker/minio/tenantconfig/acme'.
Switch the container back on, either with the on/off switch on the right hand side, or using 'Action-Start'.
Note that the new instance has a new access key and secret key, so retrieve those from the log.
You can now log into the Minio client on the NAS in your web browser using the new keys, create a bucket, upload a file, and see that file in the NAS. In our case, we saw it in volume1/docker/minio/tenant config/acme.
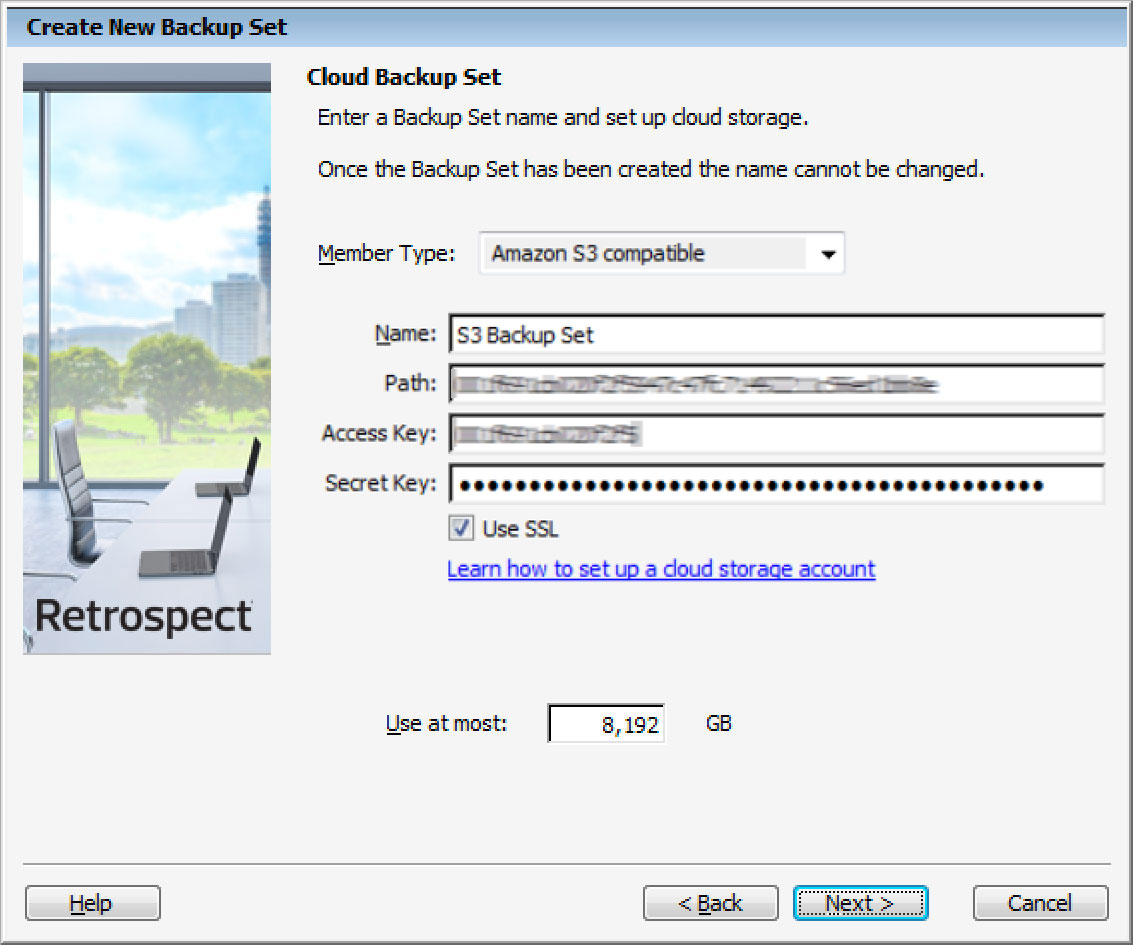
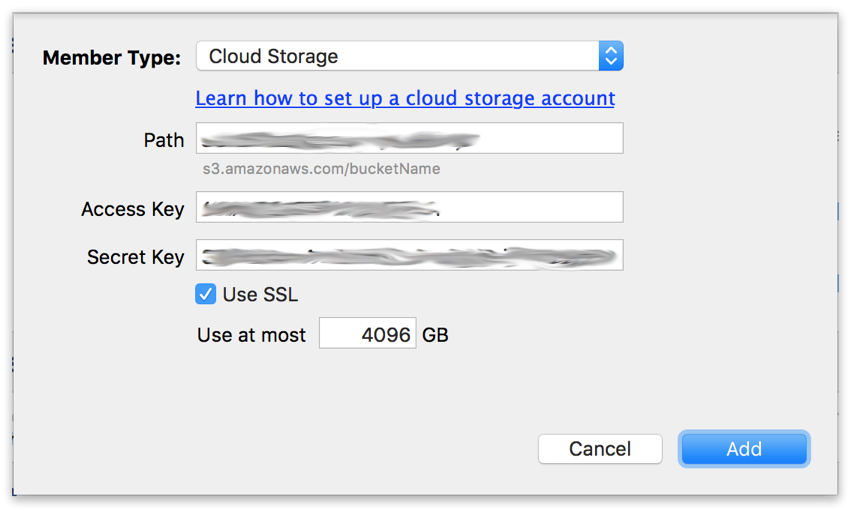
Retrospect needs three pieces of information to access Minio:
Path – url_to_instance:port_number/your_bucket_name
Access Key – Use the Access Key provided by your Minio instance.
Secret Key – Use the Secret Key provided by your Minio instance.
Einen Cloudspeicher als ein Backup-Ziel hinzuzufügen, ist ganz einfach. Retrospect hat einen neuen Set-Typus, der sich "Cloud" nennt. Richten Sie ein neues Backup-Set/Medien-Set ein und wählen Sie als Typus "Cloud".
Windows-Oberfläche

Mac-Oberfläche

Next you’ll need to enter your cloud storage credentials.
Windows-Oberfläche
Mac-Oberfläche
Den Cloudspeicher können Sie ganz leicht nutzen. Nachdem Sie Ihr Cloud-Set erstellt haben, erstellen Sie ein neues Skript oder fügen es einem bereits vorhandenen hinzu und klicken auf „Ausführen“. Das Backup beginnt und die Inhalte Ihres Sets werden auf den Cloudspeicherplatz hochgeladen. Sie können den Fortschritt unter Ausführung/Aktivität verfolgen.
Windows-Oberfläche

Mac-Oberfläche

Eine Drosselung für das Cloud-Backup und die Cloud-Wiederherstellung lässt sich unter Einstellungen einrichten.
Windows-Oberfläche

Mac-Oberfläche

Below are a number of tips for using cloud storage in Retrospect:
Tool zur Messung der Bandbreite – Messen Sie Ihre Upload- und Download-Bandbreite mit diesem kostenlosen Tool: <a target="_blank" href="http://speedtest.net">Speedtest.net</a>.
Sicherungsüberprüfung deaktivieren – Die Überprüfung wird alle Daten herunterladen, die Sie hochladen. Erfahren Sie mehr darüber, warum Sie diese Funktion für die Cloud-Sicherungen in <a href="/de/support/kb/best_practices_for_cloud_storage#notes">Cloud-Backup – Die beste Art, Daten über einen Cloudspeicher zu schützen</a> deaktivieren sollten.
Last Update: 09. August 2018